Account Integration Procedures
Guide to integrating cloud accounts with the platform.
- AWS Account Integration
- Azure Account Integration
- Microsoft 365 Account Integration
- Microsoft Entra ID Account Integration
- EKS Integration
AWS Account Integration
Link AWS Account
Navigating to the Account Integration Page
-
Log in to the Platform
- Access the platform and sign in using your credentials.
-
Open the Account Selector
- Locate the Select account dropdown at the top-right corner of the dashboard.
- Click on it to open the list of available cloud accounts.
-
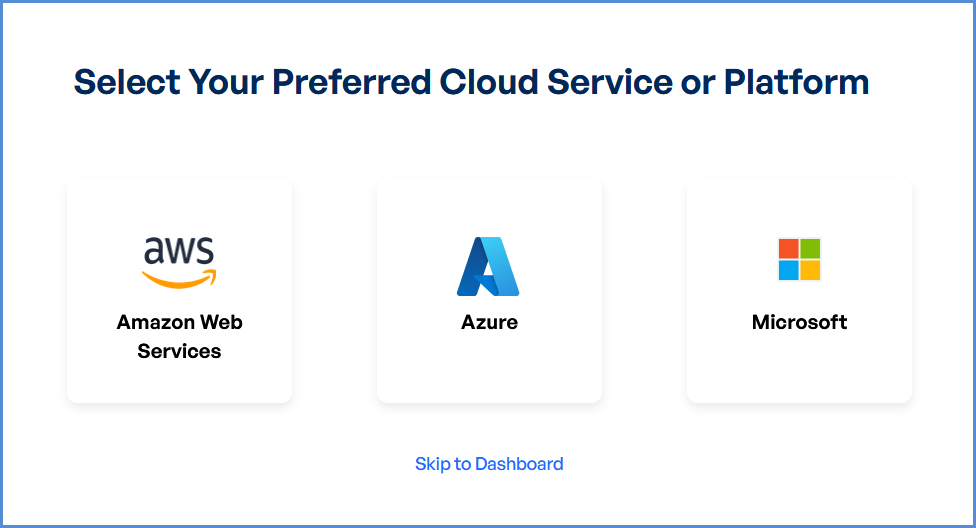
Add Cloud Account
- From the dropdown menu, click on Add Cloud Account. This will redirect you to the Select Your Preferred Cloud Service or Platform page.
- Click on the AWS (Amazon Web Services) card.
Note: Initially, only AWS Management Account can be linked in this section.
No Management Account Initially
If you do not have any management account linked initially to the Xops 360 Portal, follow the steps below to add a new AWS account. After clicking on the AWS (Amazon Web Services) card on the Select Your Preferred Cloud Service or Platform page, a new window will appear prompting you to select the AWS Account Type.
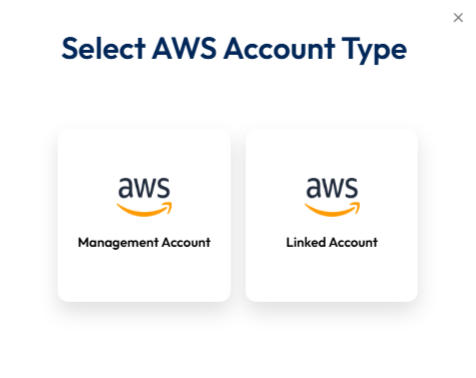
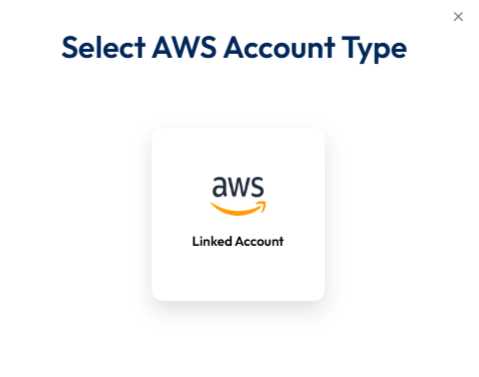
Select AWS Account Type
On the Select AWS Account Type screen, you will see two options:
-
Management Account
-
Linked Account
Click on Management Account to proceed with linking your AWS Management Account to the Xops 360 platform.
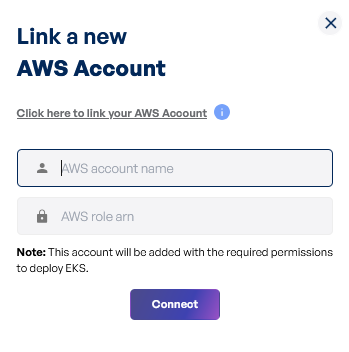
Link a New AWS Account
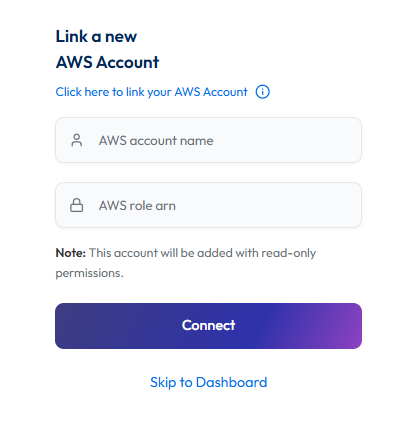
After selecting Management Account, you will be redirected to the Link a New AWS Account page.
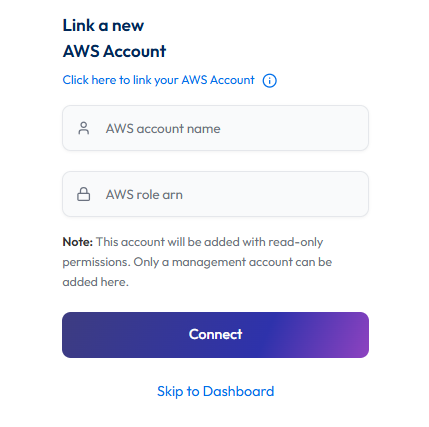
Initiating Account Integration
-
Access Setup Instructions
- Click the Information ("i") button to view step-by-step setup guidance.
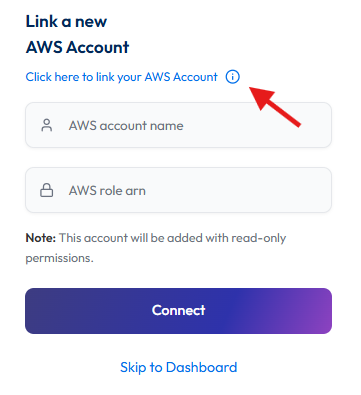
-
Retrieve AWS Role ARN
- Follow the setup guide to create a required Cloud Formation stack in the AWS Management Console.
- Once the stack is created, navigate to the Outputs tab in the stack details page.
- Copy the AWS Role ARN from the output.
-
Configure AWS Integration
- Return to the Link a New AWS Account page in the platform.
- Provide a suitable name in the AWS Account Name field.
- Paste the copied AWS Role ARN into the designated field.
- Click Connect to finalize the integration.
Adding a Linked AWS Account
If you already have a management account linked to the Xops 360 Portal and want to add a linked (child) AWS account, follow these steps:
-
Log in to the Platform
- Sign in and open the platform dashboard.
-
Open the Account Selector
- Locate the Select account dropdown at the top-right corner of the dashboard.
- Click on it to open the list of available cloud accounts.
- Add Cloud Account
- From the dropdown menu, click on Add Cloud Account. This will redirect you to the Select Your Preferred Cloud Service or Platform page.
- Click on the AWS (Amazon Web Services) card .
- After clicking on the AWS (Amazon Web Services) card on the Select Your Preferred Cloud Service or Platform page, a new window will appear prompting you to select the AWS Account Type.
Select AWS Account Type
On the Select AWS Account Type screen, the Linked Account option will be displayed.
Click on Linked Account to proceed with linking your AWS Linked Account to the Xops 360 platform.
Link a New AWS Account
After selecting Linked Account, you will be redirected to the Link a New AWS Account page.
Initiating Account Integration
-
Access Setup Instructions
- Click the Information ("i") button to view step-by-step setup guidance.
-
Retrieve AWS Role ARN
- Follow the setup guide to create a required Cloud Formation stack in the AWS Management Console.
- Once the stack is created, navigate to the Outputs tab in the stack details page.
- Copy the AWS Role ARN from the output.
-
Configure AWS Integration
- Return to the Link a New AWS Account page in the platform.
- Provide a suitable name in the AWS Account Name field.
- Paste the copied AWS Role ARN into the designated field.
- Click Connect to finalize the integration.
Note:
- For any challenges, please contact our support team at support@axiomio.com
- First-Time Login Experience
- When you log in for the first time, you will be prompted to select your preferred cloud service or platform (AWS, EKS Azure, or Microsoft). This selection is required to establish the initial account connection.
- Once your account is successfully connected to AWS, Azure, or Microsoft, this selection screen will not appear in subsequent logins. Instead, you will be directed automatically to the Home page.
- To manage or modify integrations, navigate to the "Integrations" section from the left panel in the dashboard.
AWS Account Management
Access AWS Integration Settings
-
Log in to the Platform
- Sign in and open the platform dashboard.
-
Navigate to AWS Integration
- First, select the respective account from the top-right corner of the platform.
Choose the specific account for which you want to manage or update the AWS integration settings in the XOps portal. - Open the profile menu located in the bottom-left corner of the platform interface.
- Click on your profile/email section to open the profile options.
- Select Accounts from the menu.
- You will be redirected to the Integrations page, where the AWS Accounts integration settings are available.
- First, select the respective account from the top-right corner of the platform.
Updating the Account Name
-
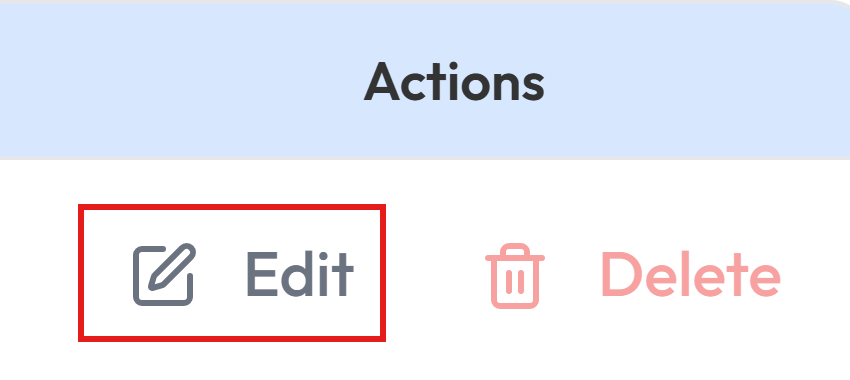
Edit the AWS Account Name
- Locate the Edit option next to the existing AWS account name.
- Click the Edit button to enable modifications.
-
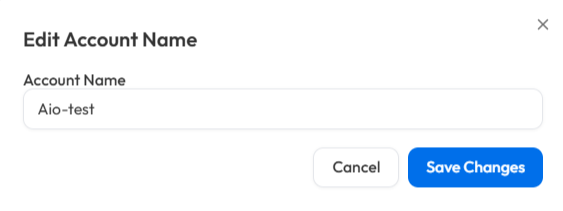
Save the New Name
- Enter the new AWS account name in the provided field.
- Click Proceed to confirm the changes.
- A success message will appear, indicating the account name update.
Deleting Linked Account
-
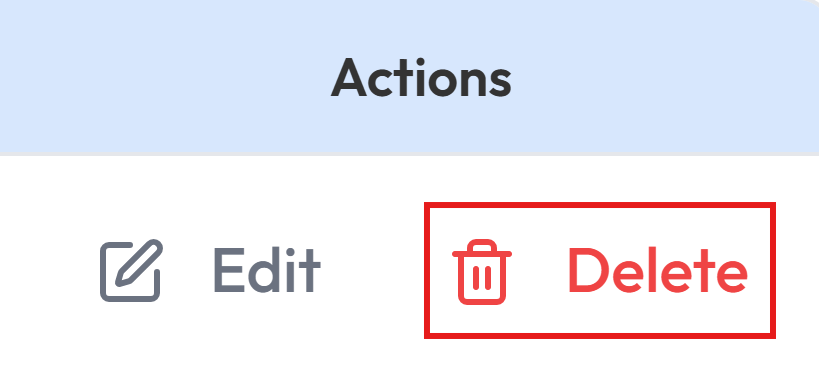
Delete the AWS Account
- Locate the Delete option next to the existing AWS account name.
- Click the Delete.
-
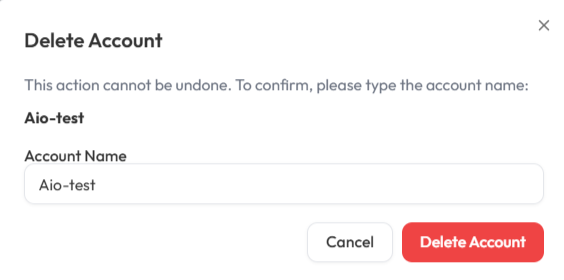
Enter the Account Name
- Enter the AWS account name in the provided field.
- Click Delete Account to confirm the changes.
- A success message will appear, indicating Account has been deleted.
Note: There is currently no provision to delete AWS Management accounts from the Xops portal. To delete the account, submit a support request via the following link:
Submit Support Request
Request Submission Guidelines:
- Subject: Clearly state that the request is for AWS Management account deletion.
- Description: Provide a detailed explanation of your request, including relevant account details and the reason for deletion.
- Once submitted, our support team will review your request and assist you accordingly.
Azure Account Integration
Link Azure Account
Navigating to the Integrations Page
-
Log in to the Platform
- Access the platform and sign in using your credentials.
-
Open the Integrations Section
- Locate the side navigation panel on the left.
- Click on the Integrations tab.
-
Select Azure Integration
- On the Integrations page, you will see available options for AWS, Azure, and Microsoft accounts.
- Click on the Azure card to open the “Link a New Azure Account” page.

Note: Follow Initiating Azure Integration steps to Connect Azure Account in Xops 360, ensure that the following permissions are assigned
Initiating Azure Integration
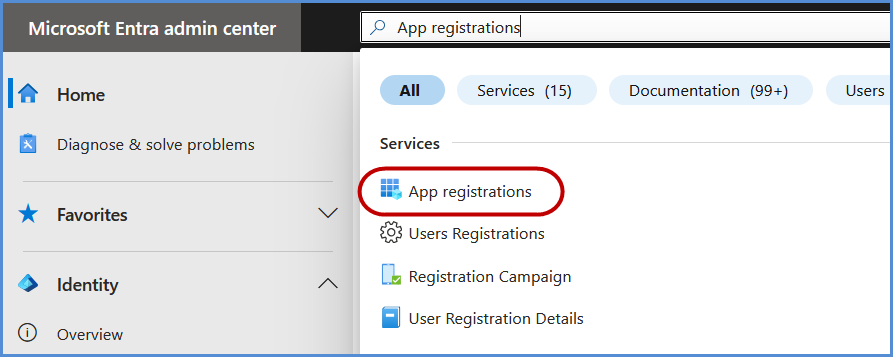
Registering an Application in Azure
-
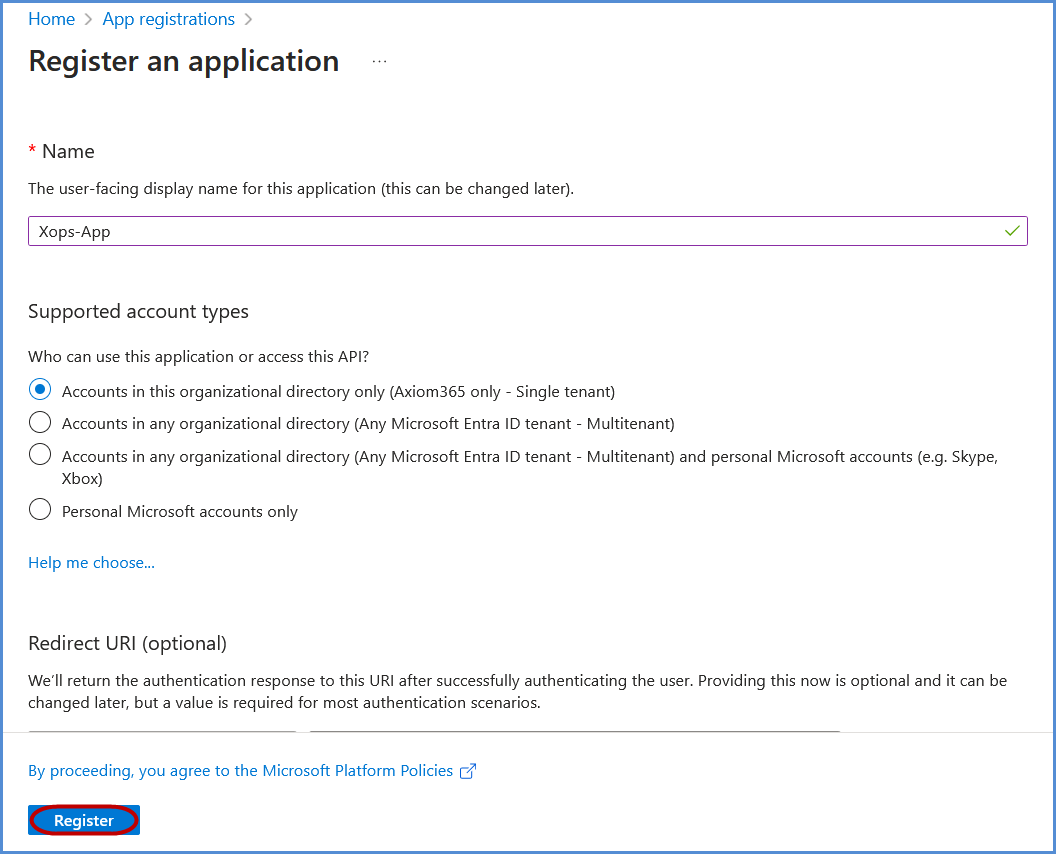
Click on New Registration.
-
Register the application:
-
Provide a name for the application.
-
Under Supported account types, select Accounts in this organizational directory only if not set by default.
-
Click Register to complete the process.
-
Assigning Entra ID Permissions
-
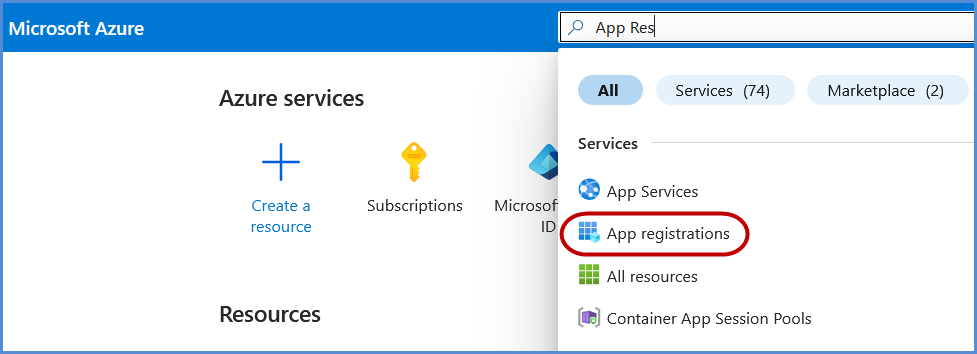
In the Azure Portal, search for Entra ID and select it.
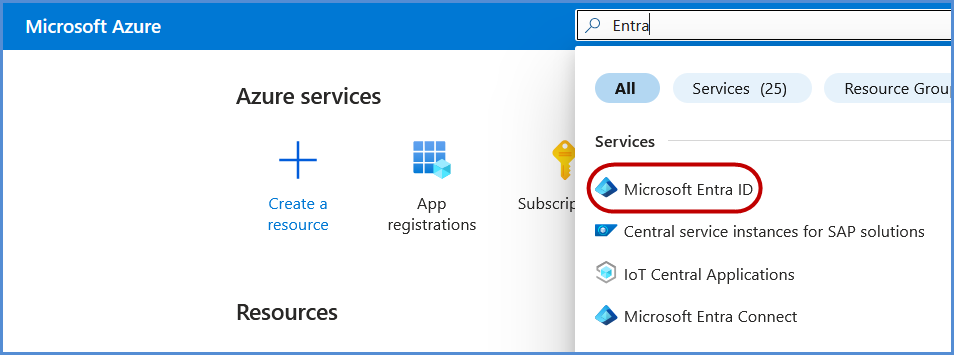
-
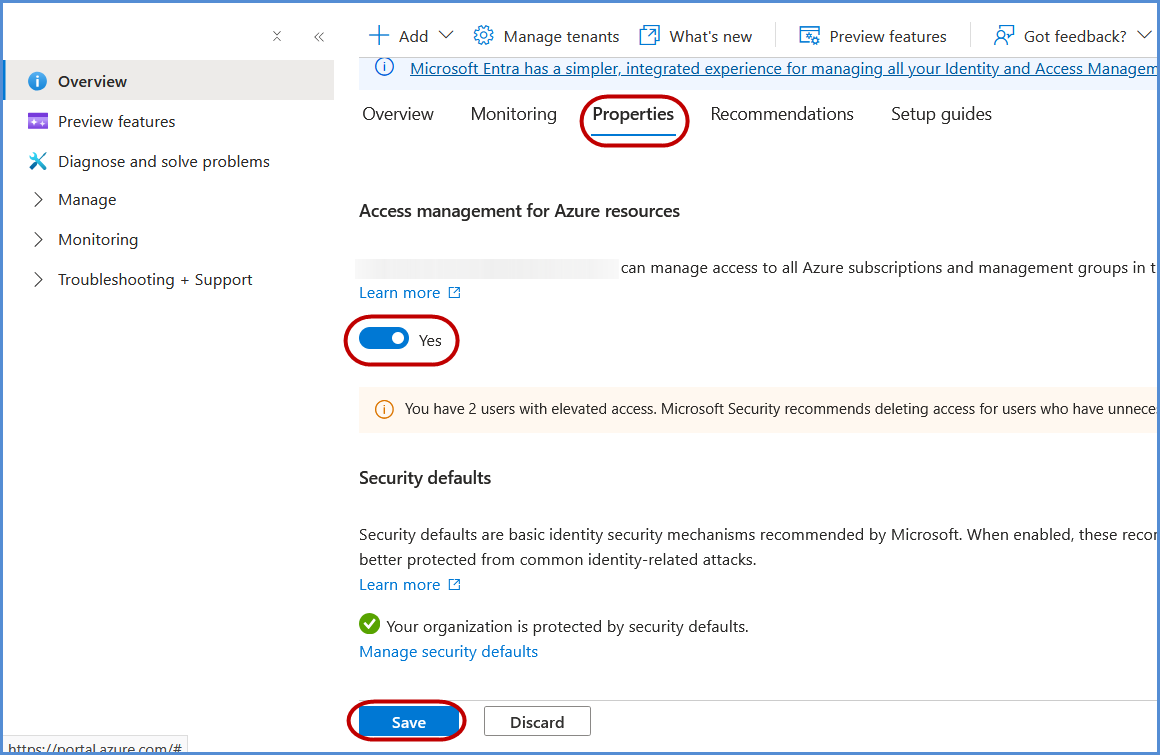
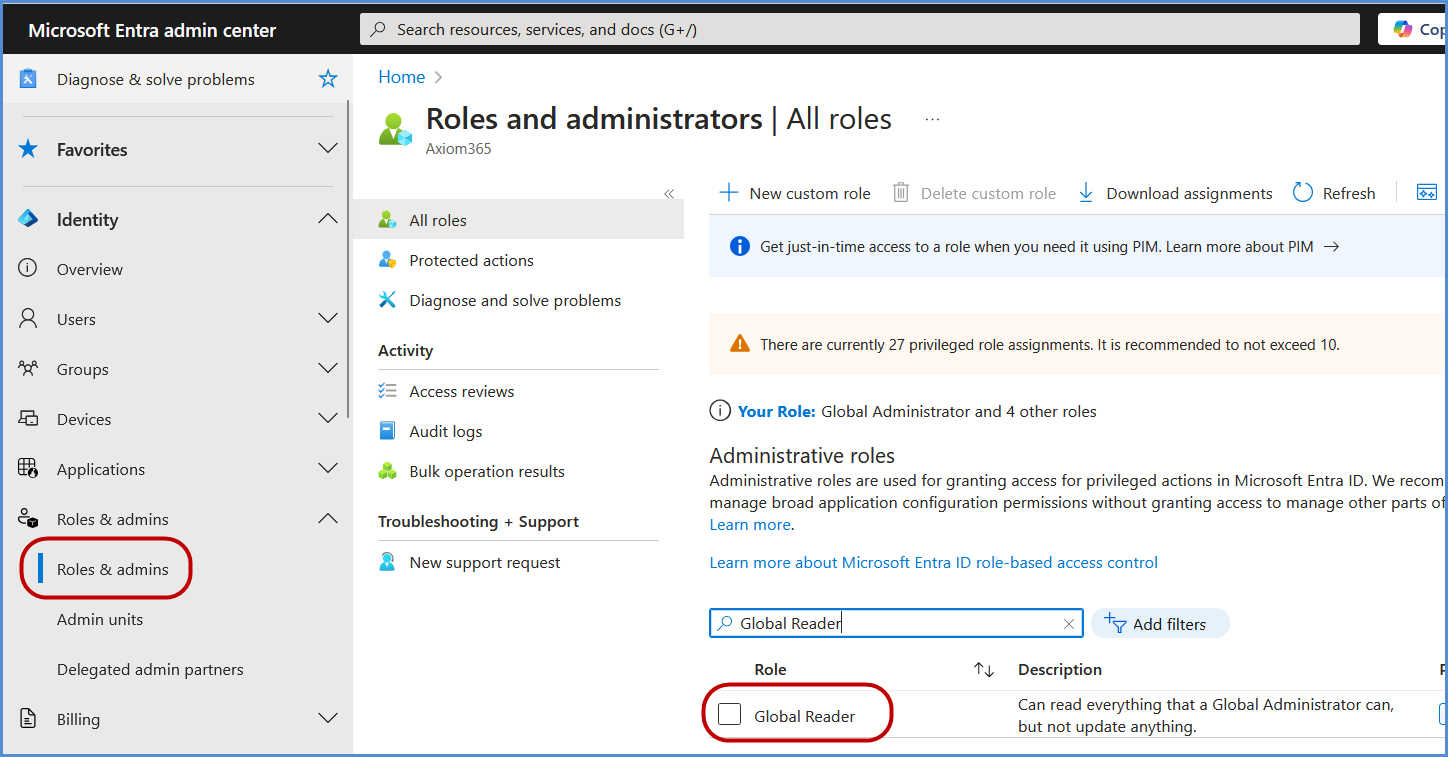
Go to Overview, and in the left navigation pane, click Roles and Administrators.
-
Search for Global Reader and select it.
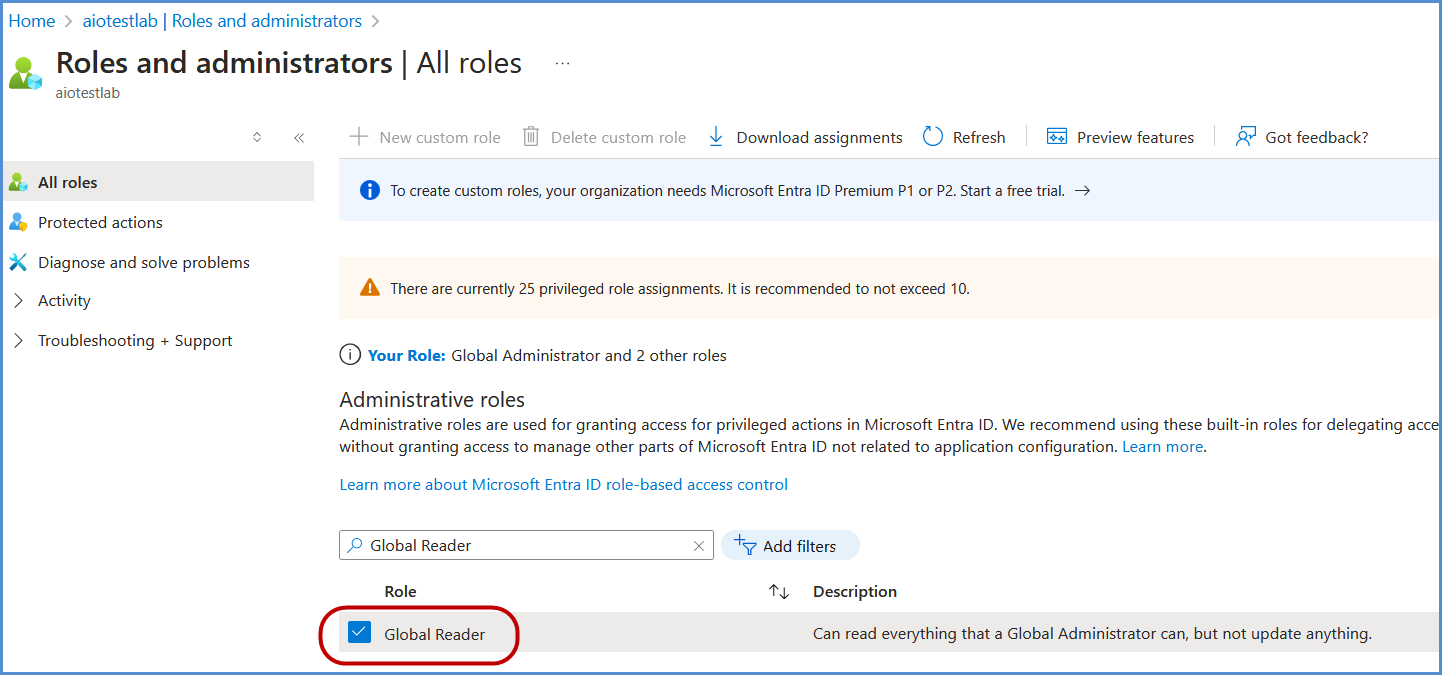
-
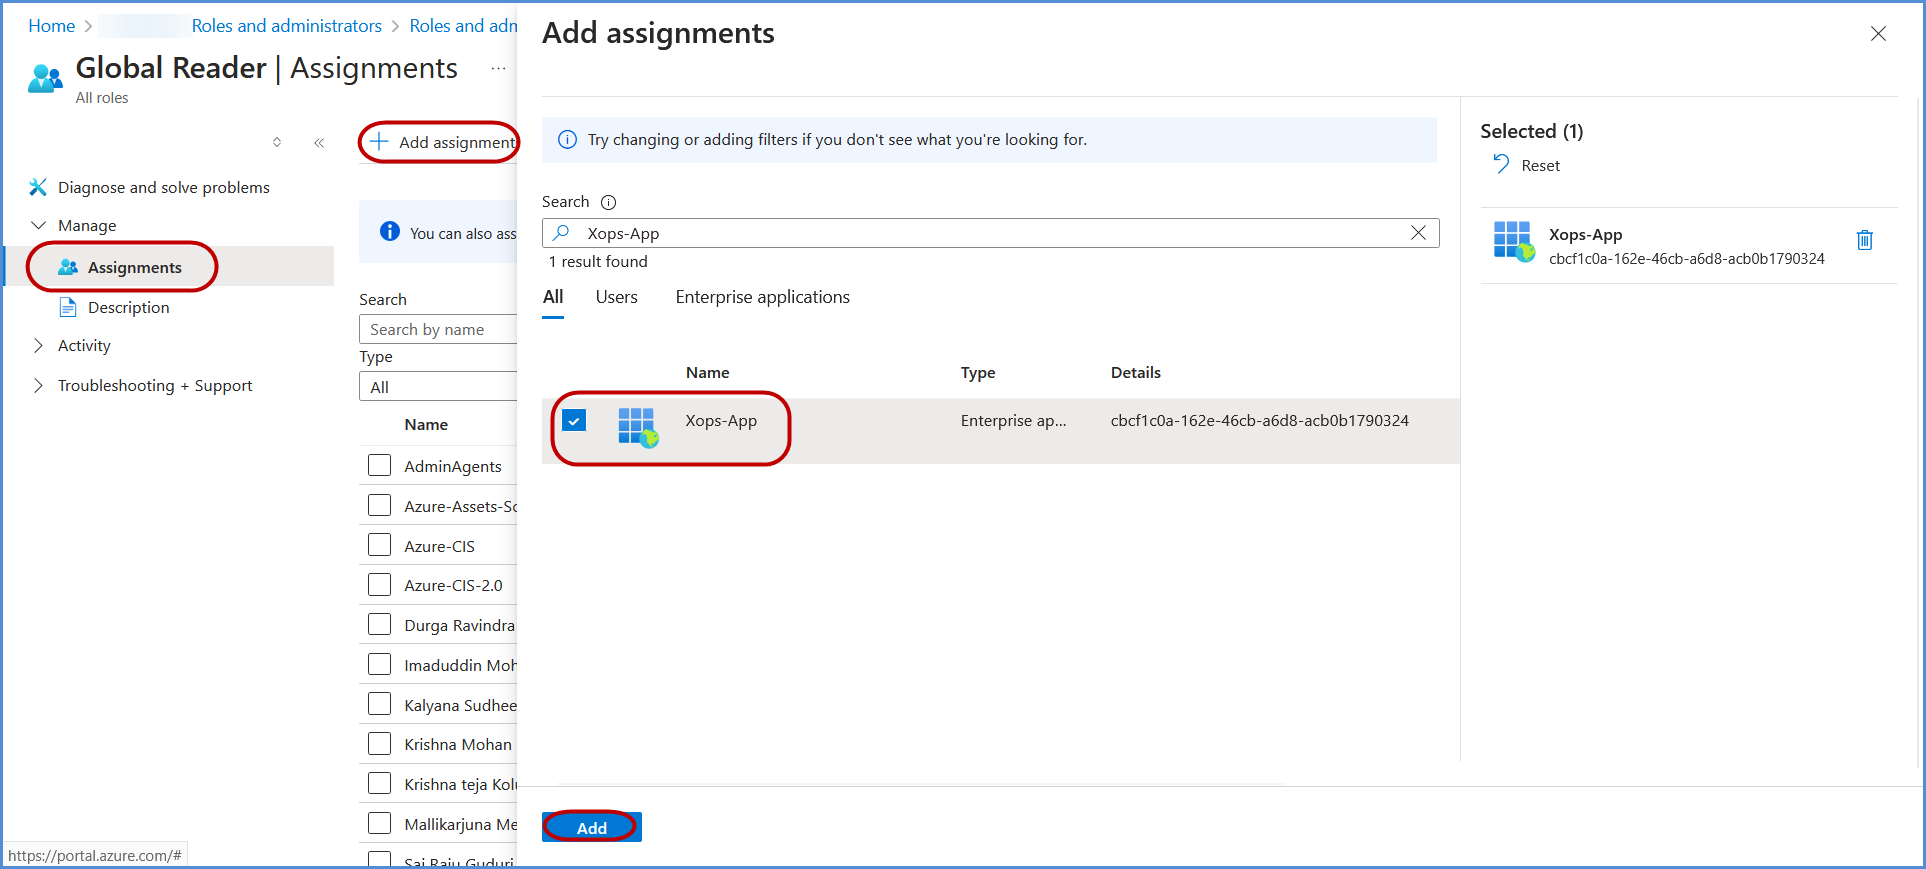
Under Assignments, search for the application registered in the previous step, select it, and click Add to grant the Global Reader role to the application.

Assigning Management Group Permissions
-
In the Azure Portal, search for Management Groups and select it.
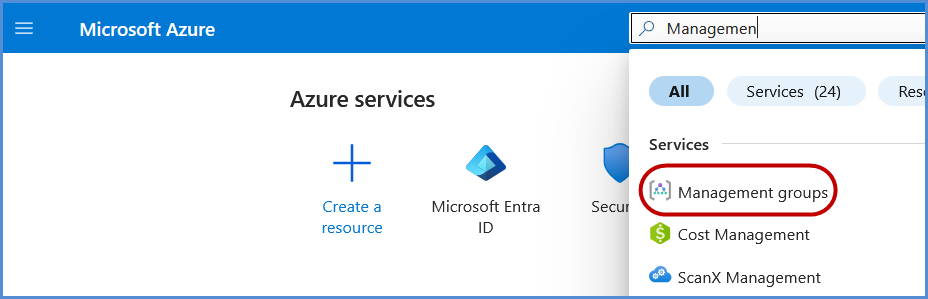
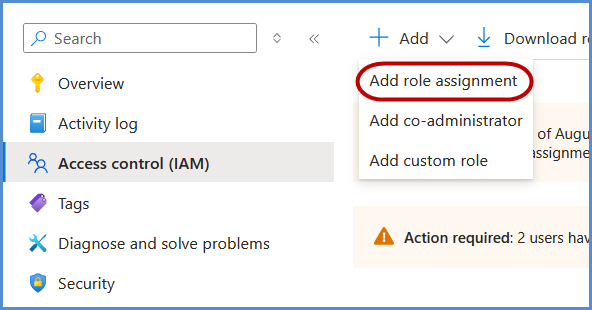
-
Under Roles, search for Reader, select it, and click Next.
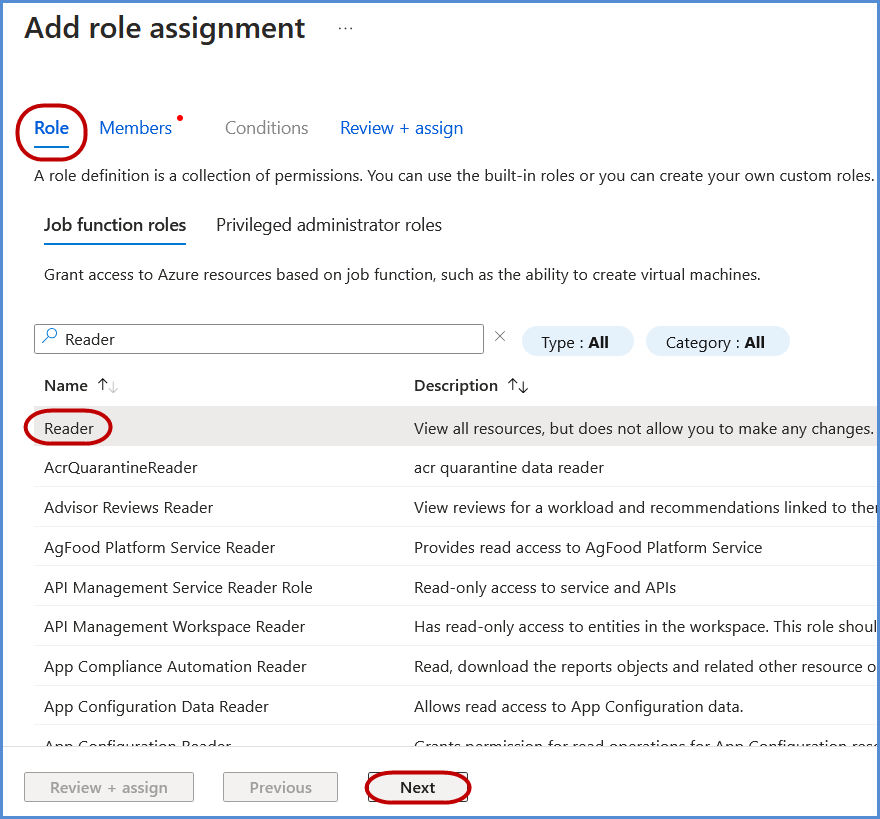
-
Under Members, click Select members, search for the application name created earlier, and select it.
-
Click Select, then Review + Assign to complete the role assignment.
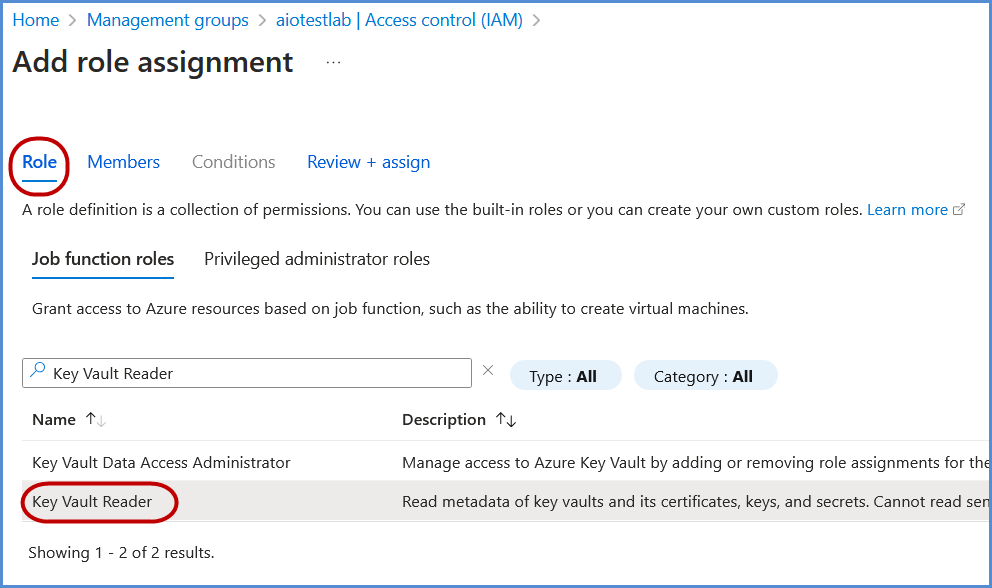
Assigning Key Vault Reader Permissions (If Applicable)
-
Follow the same steps as assigning Global Reader permissions to grant Key Vault Reader permissions.
-
If Key Vaults are configured with Access Policies (instead of RBAC), explicit permissions must be assigned to the application:
-
Grant List/Get Keys and List Secrets permissions for each Key Vault.
-
Assigning Cost Management Reader Permissions (If Applicable)
Follow the same steps as assigning Global Reader permissions to grant Cost Management Reader permissions.
Grant Cost Management Reader permissions to the application at the required scope (Management Group, Subscription, or Resource Group) to allow read-only access to cost and usage information.
Assigning Billing Reader Permissions (If Applicable)
Follow the same steps as assigning Global Reader permissions to grant Billing Reader permissions.
Grant Billing Reader permissions to the application at the required billing scope to allow read-only access to billing information, invoices, and payment details.
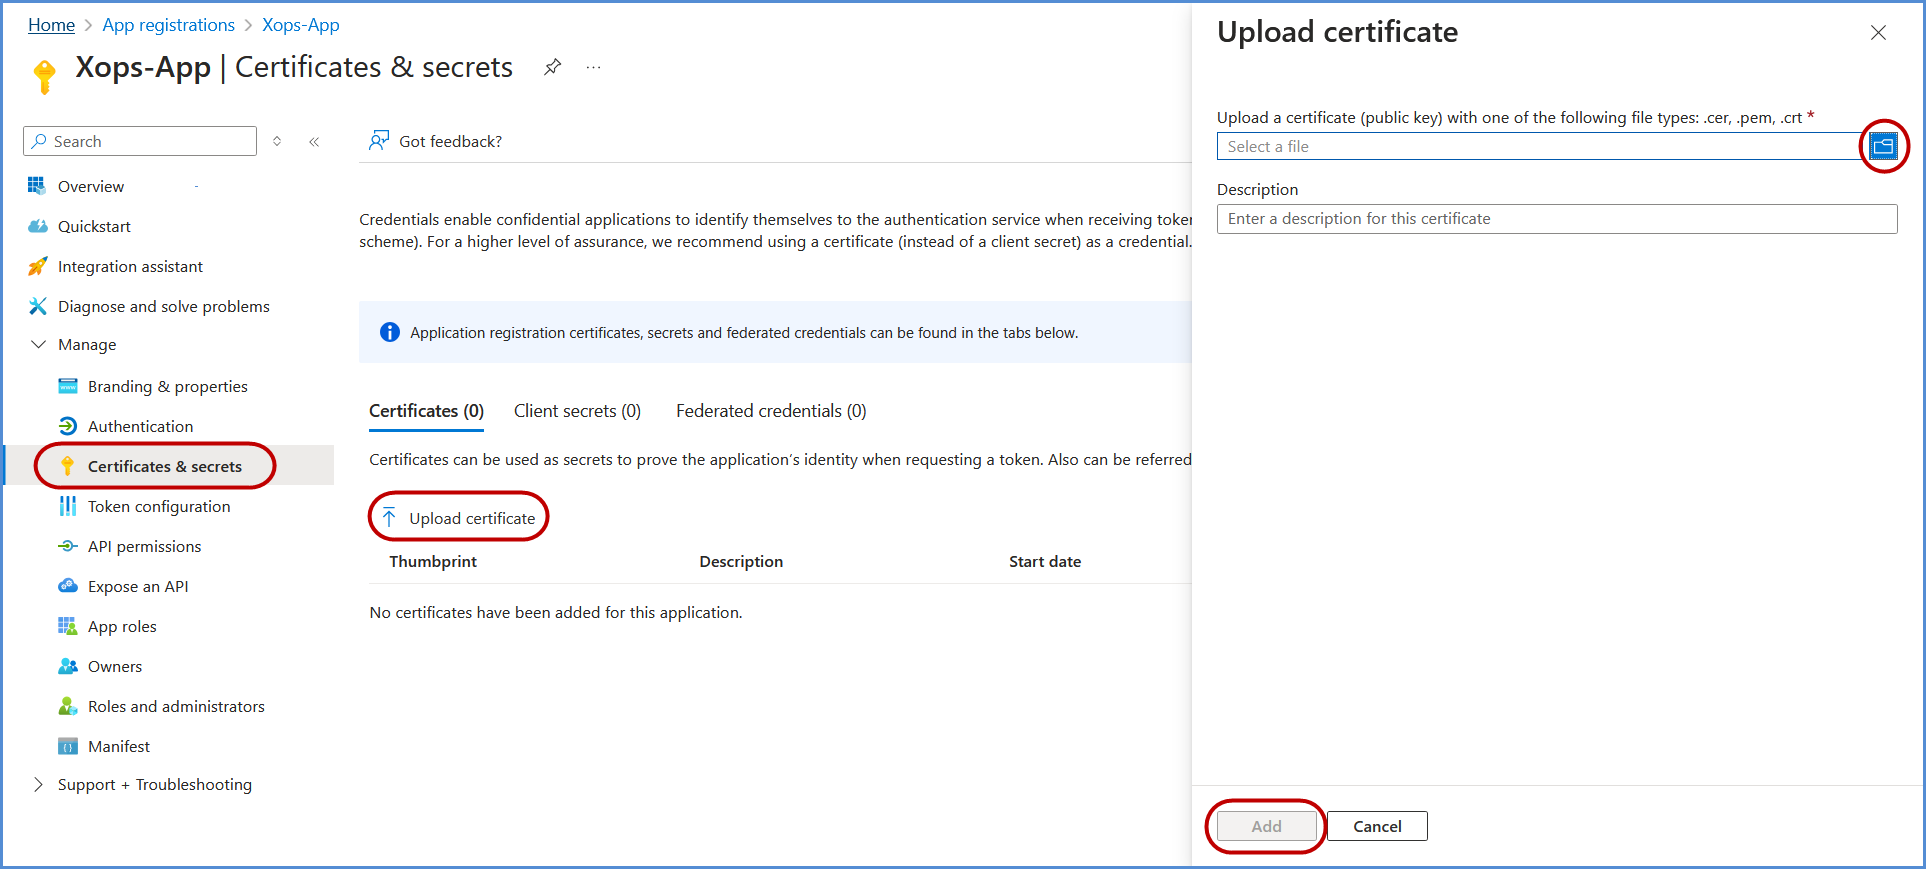
Adding a Certificate for Authentication
-
Return to the Azure Portal, open the application, and go to Manage > Certificates & Secrets.
-
Click Upload Certificate, select the certificate file downloaded earlier, and click Add to complete the upload process.
Note:
- For any challenges, please contact our support team at support@axiomio.com
- First-Time Login Experience
-
- When you log in for the first time, you will be prompted to select your preferred cloud service or platform (AWS, Azure, or Microsoft). This selection is required to establish the initial account connection.
- Once your account is successfully connected to AWS, Azure, or Microsoft, this selection screen will not appear in subsequent logins. Instead, you will be directed automatically to the Home page.
- To manage or modify integrations, navigate to the "Integrations" section from the left panel in the dashboard.
Managing Azure Subscriptions
- Access the Subscription Management Page
- Log in to the platform with your credentials.
- Navigate to the Integrations section, Select Azure icon.
- Select the connected Azure account to access the Subscription Management page.
Connecting Azure Subscriptions
- Edit the Connected Azure Account
- Locate the Azure account under Integrations.
- Click Edit to open the subscription management interface.
- View and Select Subscriptions
- List of Subscriptions: Displays all available Azure subscriptions.
- Selected Subscriptions: Highlights currently connected subscriptions.
- Select Desired Subscriptions
- Review the list of available subscriptions.
- Check the boxes next to the subscriptions you want to connect.
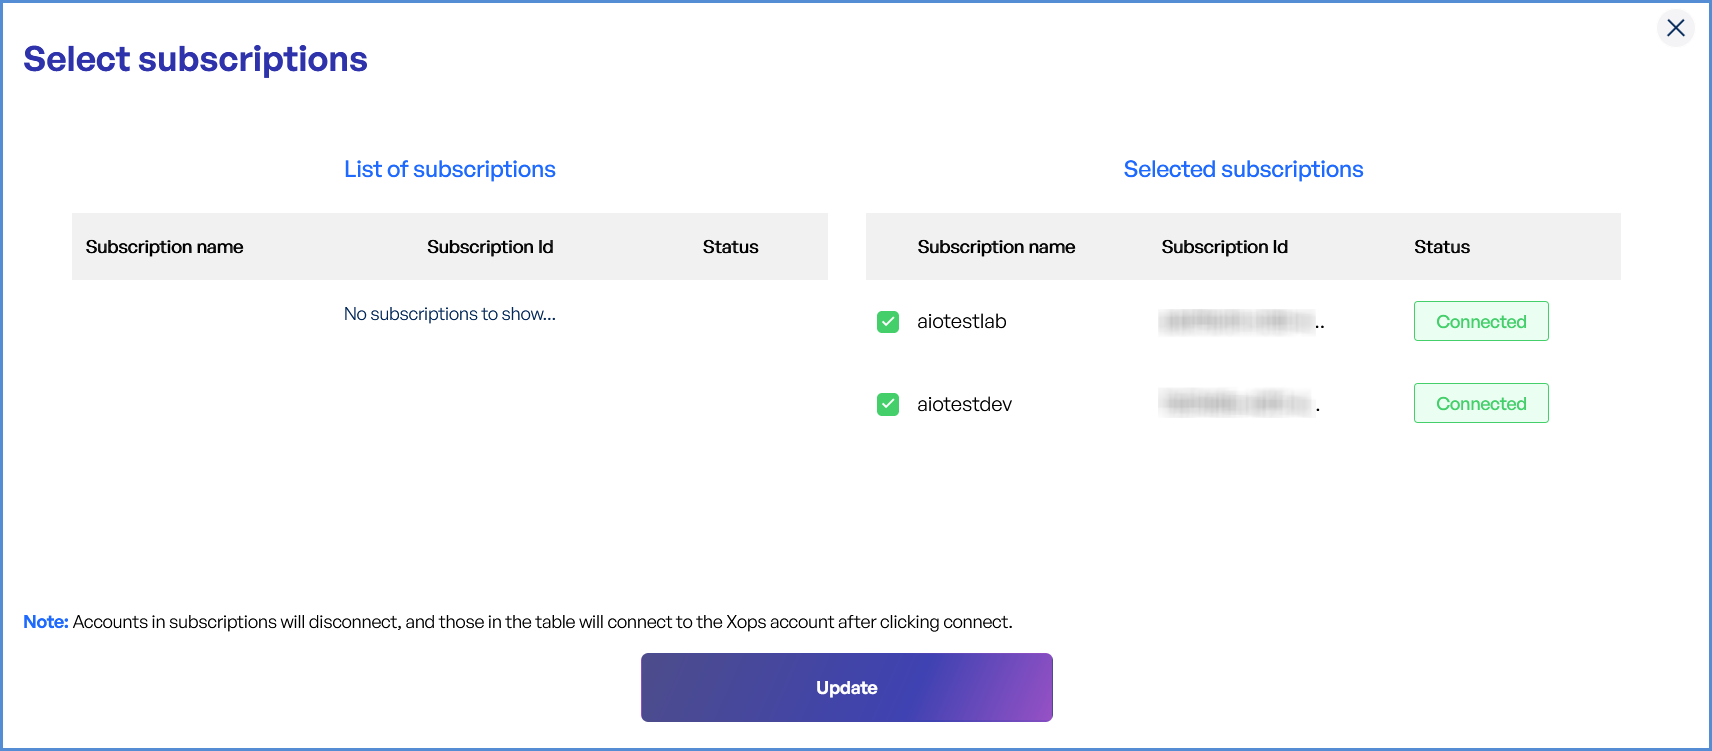
- Apply Changes
- Click Update to save and apply changes.
- Newly added subscriptions will be available in the platform.
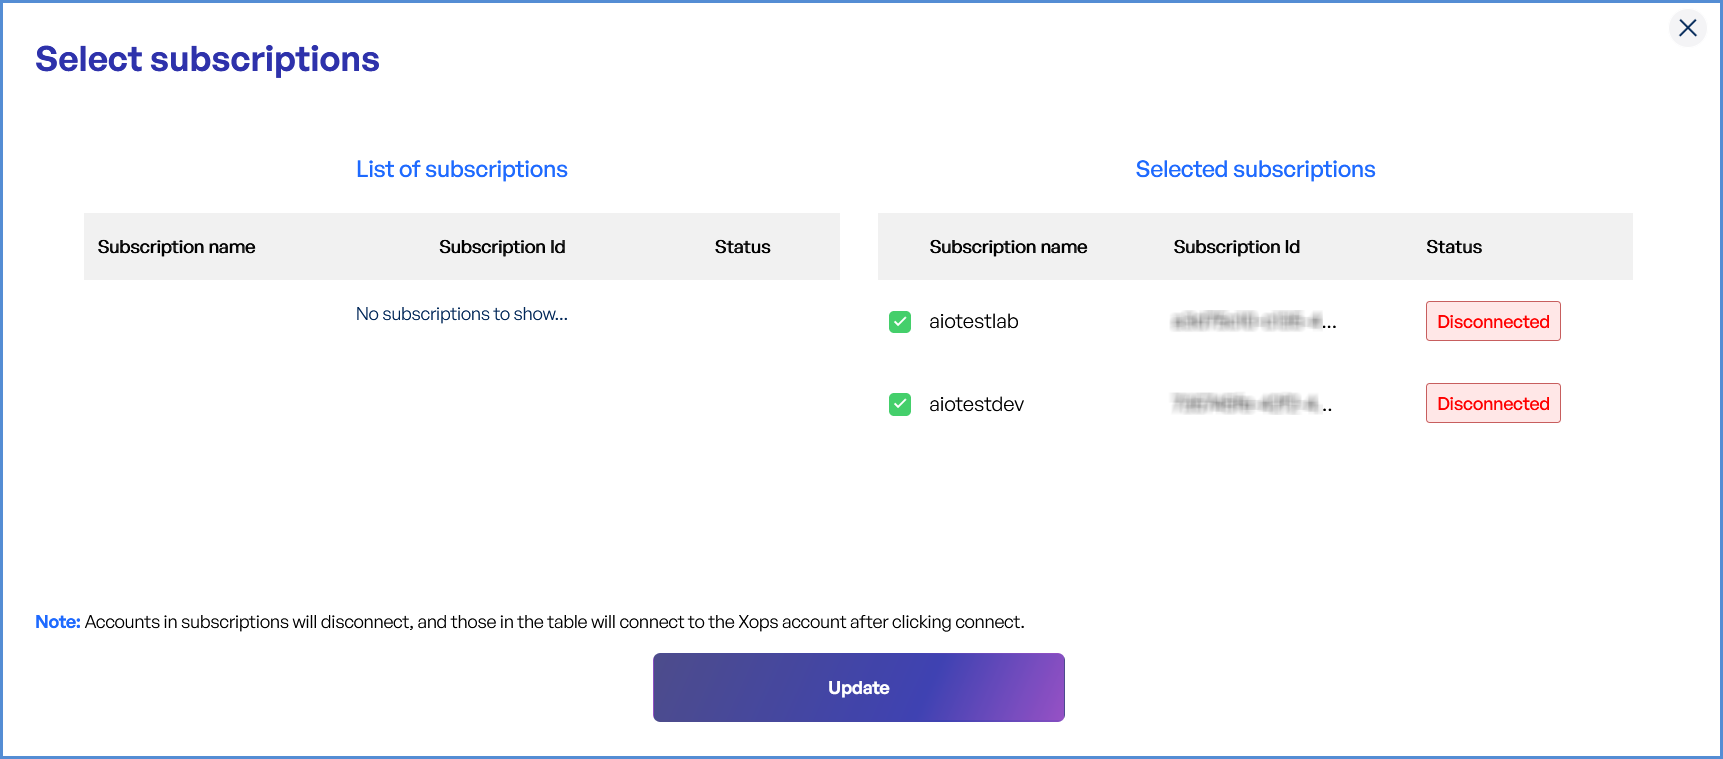
Disconnecting Azure Subscriptions
- Edit the Connected Azure Account
- Go to the Integrations section and locate the Azure account.
- Click Edit to manage the account’s subscriptions.
- Deselect Subscriptions
- Under Selected Subscriptions, uncheck the subscriptions you want to disconnect.
- Apply Changes
- Click Update to finalize changes.
- The deselected subscriptions will no longer be associated with your account.
Microsoft 365 Account Integration
Navigating to the Integrations Page
-
Log in to the Platform
- Access the platform and sign in using your credentials.
-
Open the Integrations Section
- Locate the side navigation panel on the left.
- Click on the Integrations tab.
-
Select Microsoft Integration
- On the Integrations page, you will see available options for AWS, Azure, and Microsoft accounts.
- Click on the Microsoft card then click on M365 to open the “Link a New Microsoft Account” page.
Note: Follow Initiating M365 Integration steps to Connect Microsoft 365 Account in Xops 360, ensure that the following permissions are assigned
Initiating M365 Integration
Registering an Application and configuration in Microsoft Entra Admin center
-
Click on New Registration.
-
Register the application:
-
Provide a name for the application.
-
Under Supported account types, select Accounts in this organizational directory only if not set by default.
-
Click Register to complete the process.
-

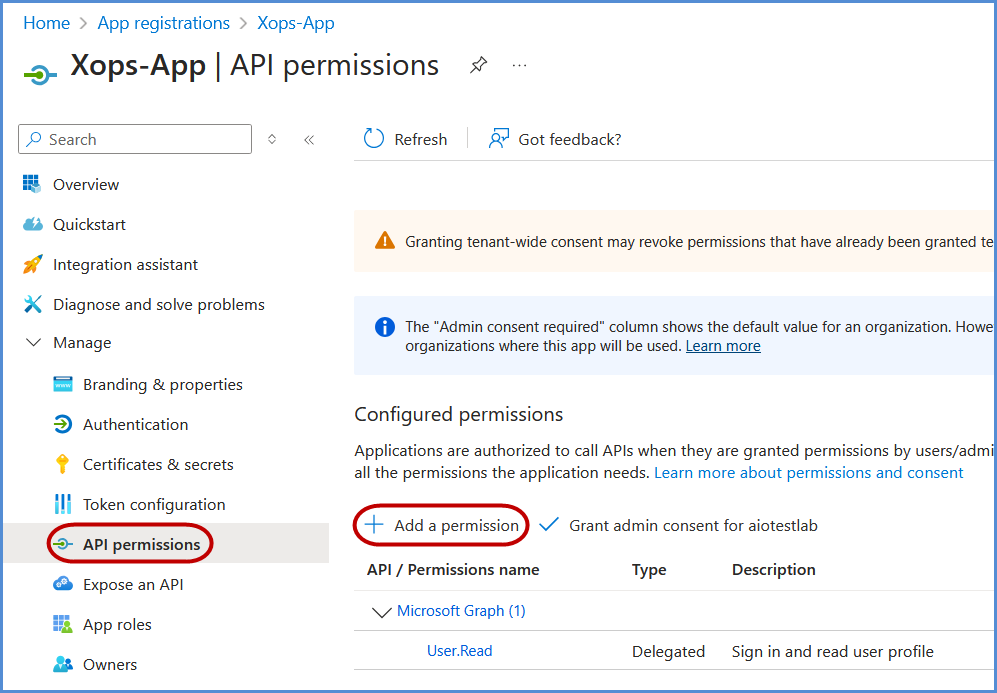
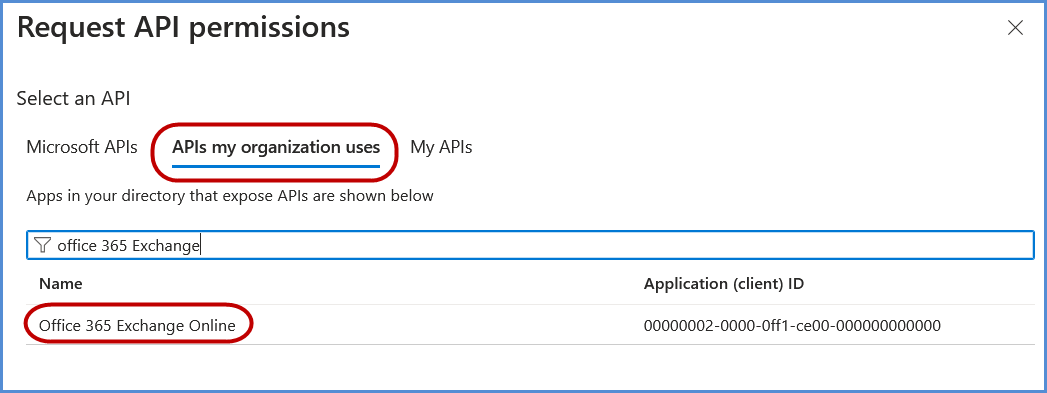
- Select APIs my organization uses and search for Office 365 Exchange Online, then click on it.
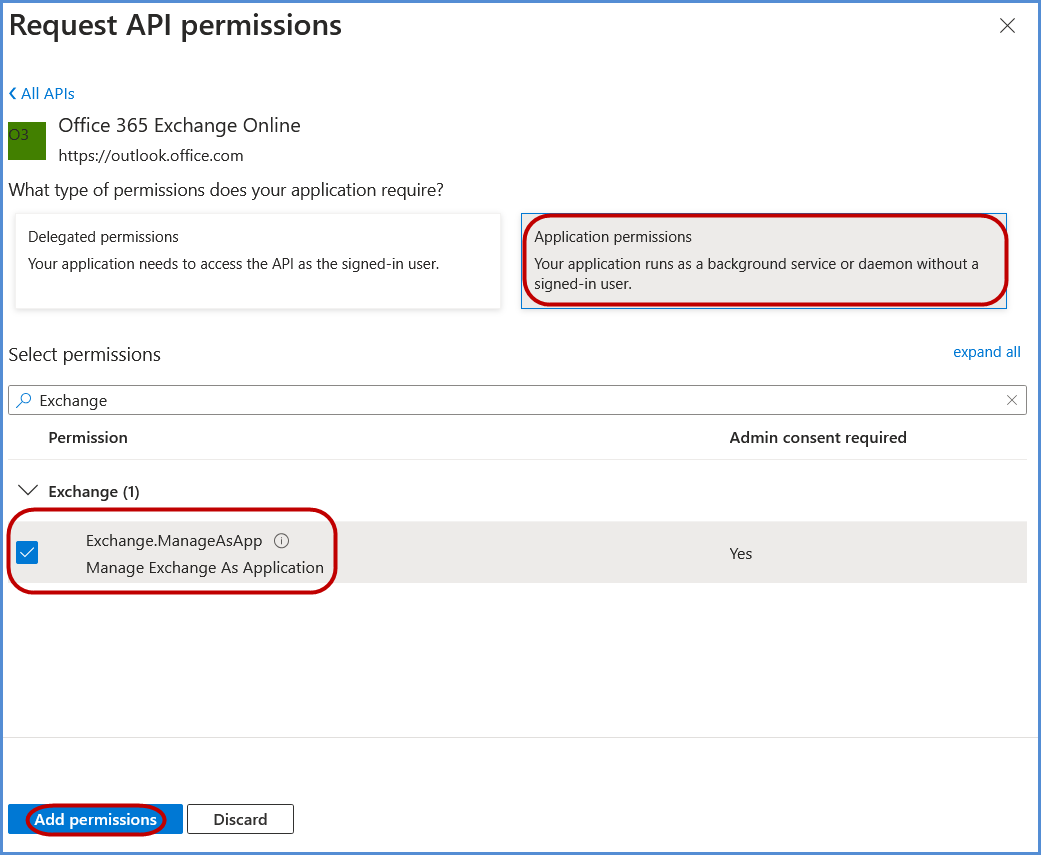
- Choose Application permissions, search for Exchange.ManageAsApp, select it, and click Add permissions.
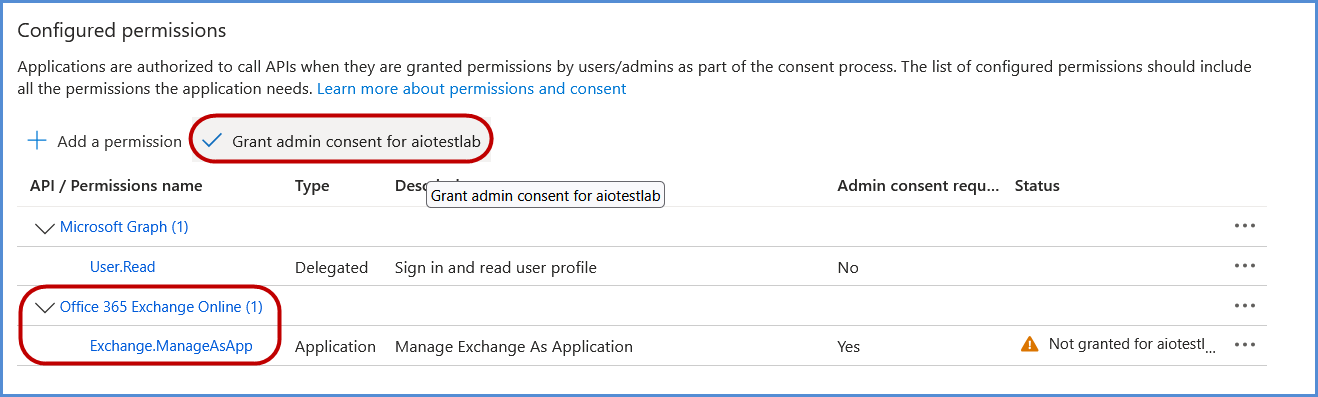
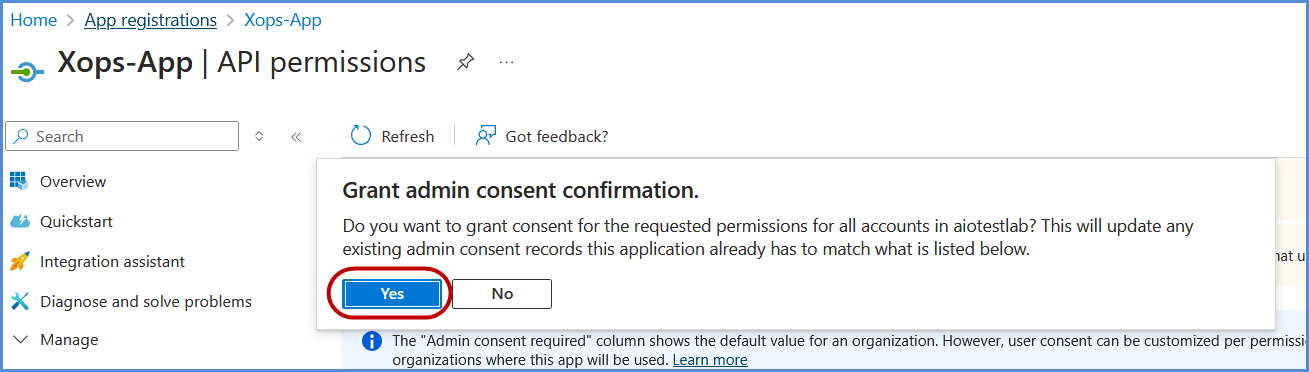
- Click on Grant admin consent and confirm by selecting Yes in the confirmation popup.
Assigning Entra ID Permissions
-
In the Azure Portal, search for Entra ID and select it.

-
Go to Overview, and in the left navigation pane, click Roles and Administrators.
-
Search for Global Reader and select it.
-
Under Assignments, search for the application registered in the previous step, select it, and click Add to grant the Global Reader role to the application.
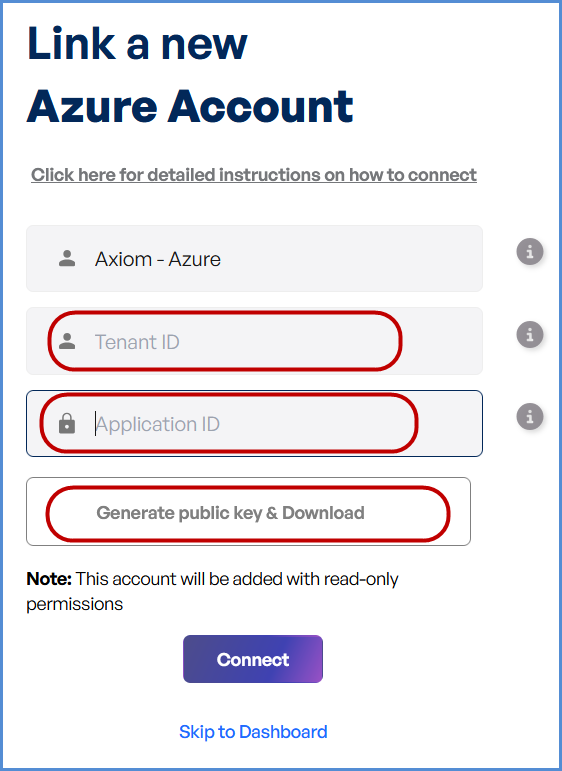
Adding a Certificate for Authentication
-
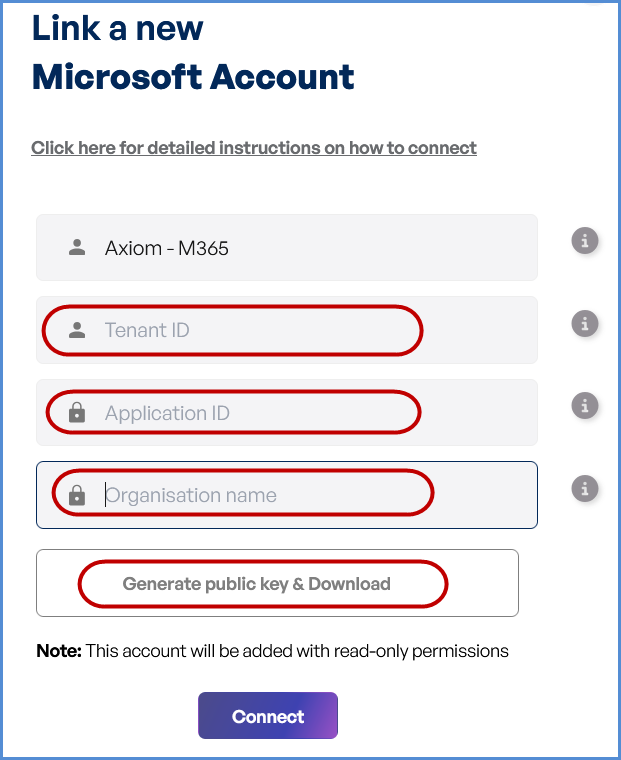
Access the Xops 360 Portal and navigate to Integrations , Select Microsoft icon then click on Add Account for Microsoft.
-
Enter a friendly name for the account.
-
Provide the App ID, Tenant ID copied earlier.
- Provide the Organization ID copied earlier.
-
Click Generate Public Key & Download the generated key.
-
-
Return to the Microsoft Entra Admin center Portal, open the application, and go to Manage > Certificates & Secrets.
-
Click Upload Certificate, select the certificate file downloaded earlier, and click Add to complete the upload process.
Note: The M365 scan requires all users/accounts to have the O365_BUSINESS_PREMIUM license; missing licenses may cause scan failure.
Note:
- For any challenges, please contact our support team at support@axiomio.com
- First-Time Login Experience
- When you log in for the first time, you will be prompted to select your preferred cloud service or platform (AWS, Azure, or Microsoft). This selection is required to establish the initial account connection.
- Once your account is successfully connected to AWS, Azure, or Microsoft, this selection screen will not appear in subsequent logins. Instead, you will be directed automatically to the Home page.
- To manage or modify integrations, navigate to the "Integrations" section from the left panel in the dashboard.
Microsoft Entra ID Account Integration
Navigating to the Integrations Page
-
Log in to the Platform
- Access the platform and sign in using your credentials.
-
Open the Integrations Section
- Locate the side navigation panel on the left.
- Click on the Integrations tab.
-
Select Microsoft Integration
- On the Integrations page, you will see available options for AWS, Azure, and Microsoft accounts.
- Click on the Microsoft card then click on M365 to open the “Link a New Microsoft Account” page.
Initiating Entra ID Integration
Registering an Application and configuration in Microsoft Entra Admin center
-
Click on New Registration.
-
Register the application:
-
Provide a name for the application.
-
Under Supported account types, select Accounts in this organizational directory only if not set by default.
-
Click Register to complete the process.
-
- Select Microsoft APIs and click on Microsoft Graph.

- Choose Application permissions, search for AccessReview.Read.All, select it, and click Add permissions.
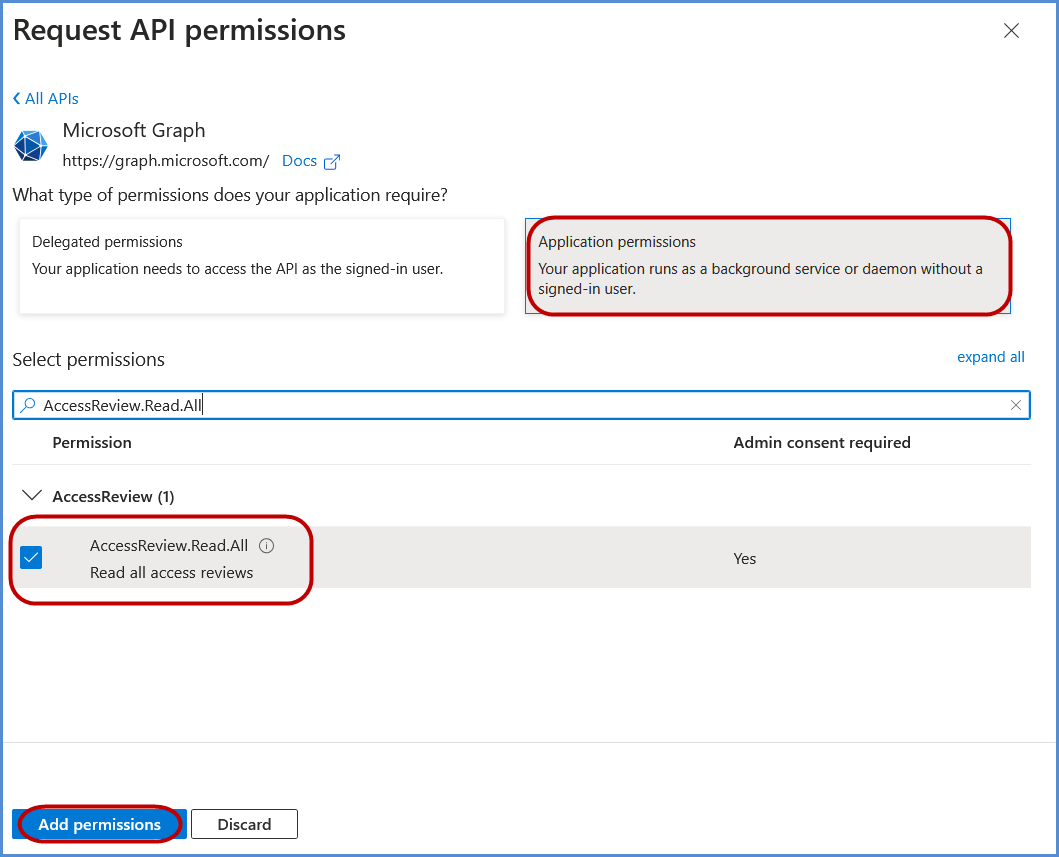
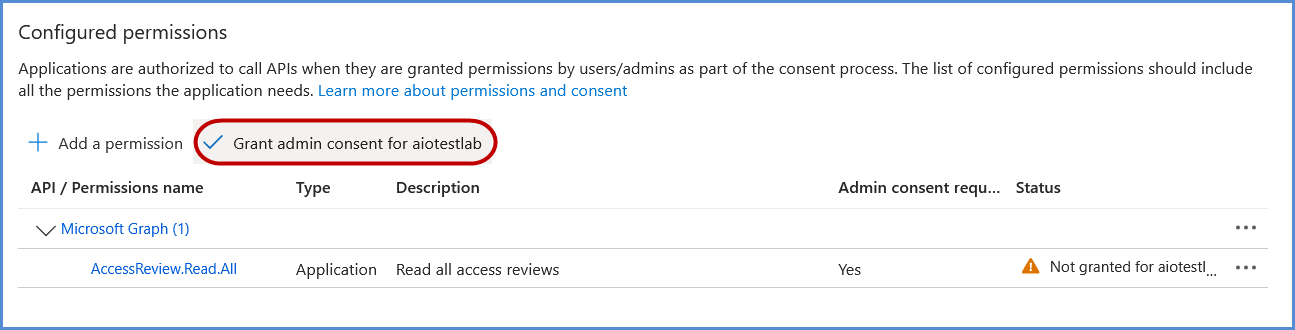
- Click on Grant admin consent and confirm by selecting Yes in the confirmation popup.
Assigning Entra ID Permissions
-
In the Azure Portal, search for Entra ID and select it.
-
Go to Overview, and in the left navigation pane, click Roles and Administrators.
-
Search for Global Reader and select it.
-
Under Assignments, search for the application registered in the previous step, select it, and click Add to grant the Global Reader role to the application.
Adding a Certificate for Authentication
-
Return to the Microsoft Entra Admin center Portal, open the application, and go to Manage > Certificates & Secrets.
-
Click Upload Certificate, select the certificate file downloaded earlier, and click Add to complete the upload process.
Note:
- For any challenges, please contact our support team at support@axiomio.com
- First-Time Login Experience
-
- When you log in for the first time, you will be prompted to select your preferred cloud service or platform (AWS, Azure, or Microsoft). This selection is required to establish the initial account connection.
- Once your account is successfully connected to AWS, Azure, or Microsoft, this selection screen will not appear in subsequent logins. Instead, you will be directed automatically to the Home page.
- To manage or modify integrations, navigate to the "Integrations" section from the left panel in the dashboard.
EKS Integration
Link EKS Account
Navigating to the Integrations Page
-
Log in to the Platform
- Access the platform and sign in using your credentials.
-
Open the Integrations Section
- Locate the side navigation panel on the left.
- Click on the Integrations tab.
-
Select EKS Integration
- On the Integrations page, you will see available options for AWS, Azure, Microsoft accounts and EKS.
- Click on the EKS card to open the “Link a New AWS Account” page.
Initiating Account Integration
-
Access Setup Instructions
- Click the Information ("i") button to view step-by-step setup guidance.
-
Retrieve AWS Role ARN
- Follow the setup guide to create a required Cloud Formation stack in the AWS Management Console.
- Once the stack is created, navigate to the Outputs tab in the stack details page.
- Copy the AWS Role ARN from the output.
-
Configure AWS Integration
- Return to the platform’s AWS Integration page.
- Provide a suitable name in the AWS Account Name field.
- Paste the copied AWS Role ARN into the designated field.
- Click Connect to finalize the integration.
Note:
- For any challenges, please contact our support team at support@axiomio.com
- First-Time Login Experience
- When you log in for the first time, you will be prompted to select your preferred cloud service or platform (AWS, EKS Azure, or Microsoft). This selection is required to establish the initial account connection.
- Once your account is successfully connected to AWS, Azure, or Microsoft, this selection screen will not appear in subsequent logins. Instead, you will be directed automatically to the Home page.
- To manage or modify integrations, navigate to the "Integrations" section from the left panel in the dashboard.