EKS Deployment Guide
Prerequisites
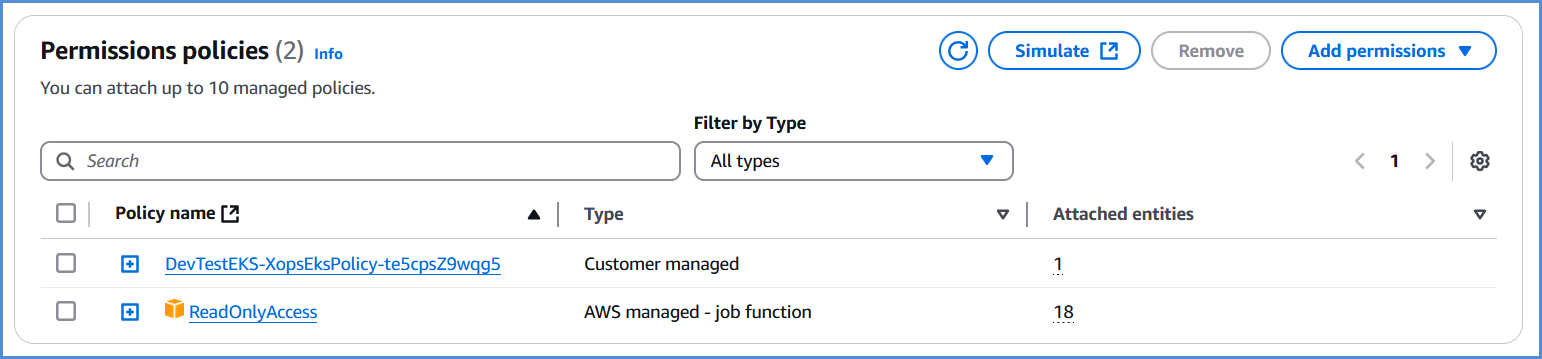
- Before deploying EKS, ensure that the AWS role created via the Xops 360 portal has the necessary permissions and Read-only access policy assigned. If no policies are found,
pleaseplease add an AWS account for EKS deployment.
{
"Version": "2012-10-17","Statement": [{"Action": ["ec2:AuthorizeSecurityGroupIngress","ec2:DescribeInstances","ec2:AttachInternetGateway","iam:PutRolePolicy","iam:AddRoleToInstanceProfile","ec2:DeleteRouteTable","eks:DescribeAddon","ec2:RevokeSecurityGroupEgress","ec2:CreateRoute","ec2:CreateInternetGateway","ec2:DeleteInternetGateway","iam:ListRolePolicies","iam:DeleteOpenIDConnectProvider","iam:GetRole","iam:GetPolicy","ec2:CreateTags","iam:ListEntitiesForPolicy","iam:DeleteRole","ec2:RunInstances","ec2:DisassociateRouteTable","ec2:ReplaceNetworkAclAssociation","ec2:RevokeSecurityGroupIngress","ec2:DeleteNatGateway","eks:UpdateNodegroupConfig","eks:ListClusters","iam:GetOpenIDConnectProvider","ec2:CreateSubnet","ec2:DescribeSubnets","ec2:DeleteNetworkAclEntry","iam:CreateInstanceProfile","ec2:DisassociateAddress","ec2:CreateNatGateway","ec2:CreateVpc","ec2:DescribeAddressesAttribute","ec2:DescribeVpcAttribute","iam:ListInstanceProfilesForRole","iam:PassRole","ec2:DescribeAvailabilityZones","iam:DeleteRolePolicy","sts:DecodeAuthorizationMessage","ec2:DeleteLaunchTemplateVersions","ec2:DeleteNetworkAcl","eks:CreateCluster","iam:DeleteInstanceProfile","ec2:ReleaseAddress","ec2:DeleteLaunchTemplate","eks:UntagResource","eks:AssociateAccessPolicy","eks:UpdateAccessEntry","ec2:DescribeSecurityGroups","iam:CreatePolicy","iam:CreateServiceLinkedRole","ec2:CreateLaunchTemplate","ec2:DescribeVpcs","eks:TagResource","eks:CreateAccessEntry","iam:UpdateAssumeRolePolicy","iam:GetPolicyVersion","ec2:DeleteSubnet","iam:RemoveRoleFromInstanceProfile","iam:CreateRole","iam:AttachRolePolicy","eks:UpdateClusterConfig","ssm:GetParameter","ec2:AssociateRouteTable","ec2:DescribeInternetGateways","eks:DescribeNodegroup","iam:DetachRolePolicy","iam:ListAttachedRolePolicies","ec2:DescribeNetworkAcls","ec2:DescribeRouteTables","eks:ListNodegroups","ec2:DescribeLaunchTemplates","ec2:CreateRouteTable","ec2:DetachInternetGateway","eks:DescribeAccessEntry","eks:DeleteCluster","eks:DeleteNodegroup","ec2:DescribeInstanceTypes","eks:CreateAddon","eks:DescribeCluster","ec2:DeleteVpc","eks:DeleteAccessEntry","eks:UpdateClusterVersion","ec2:DescribeAddresses","ec2:DeleteTags","iam:DeletePolicy","eks:UpdateNodegroupVersion","eks:ListAssociatedAccessPolicies","ec2:DescribeNetworkInterfaces","ec2:CreateSecurityGroup","ec2:CreateNetworkAcl","ec2:ModifyVpcAttribute","ec2:AuthorizeSecurityGroupEgress","ec2:DeleteRoute","ec2:DescribeLaunchTemplateVersions","ec2:DescribeNatGateways","eks:CreateNodegroup","ec2:AllocateAddress","ec2:CreateLaunchTemplateVersion","iam:CreateOpenIDConnectProvider","ec2:DescribeImages","iam:ListPolicyVersions","eks:DeleteAddon","eks:DescribeUpdate","eks:DisassociateAccessPolicy","ec2:DeleteSecurityGroup","ec2:CreateNetworkAclEntry"],"Resource": "*","Effect": "Allow","Sid": "EksPermissions"},{"Action": ["lambda:GetFunction","secretsmanager:GetSecretValue","iam:ListAccessKeys","s3:GetObject","codecommit:GitPull"],"Resource": "*","Effect": "Deny","Sid": "ExplicitDeny"}]
}
EKS Deployment Deployment
- Log in to the Platform
- Access the platform and sign in using your credentials.
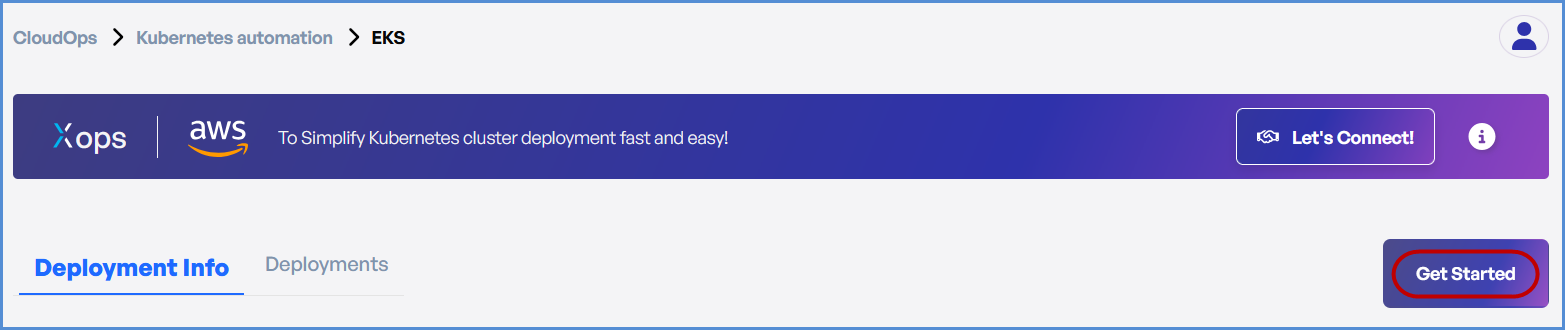
- Navigate to CloudOps
-
Locate the Navigation Bar on the left-hand side of the screen.
-
Navigate to Kubernetes Automation, then select EKS.
-

- Click on Get Started on EKS page.
AWS Account Selection
Choose based on your requirement:
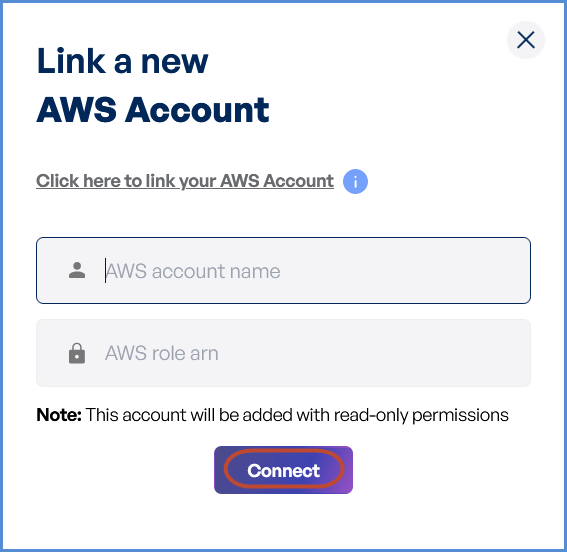
- If an AWS account has not been added:
- Click on New Account.
- Provide a suitable name in the AWS Account Name field.
- Paste the copied AWS Role ARN into the designated field.
Note: Follow Initiating Account Integration steps to retrieve the AWS Role ARN and connect your AWS account.
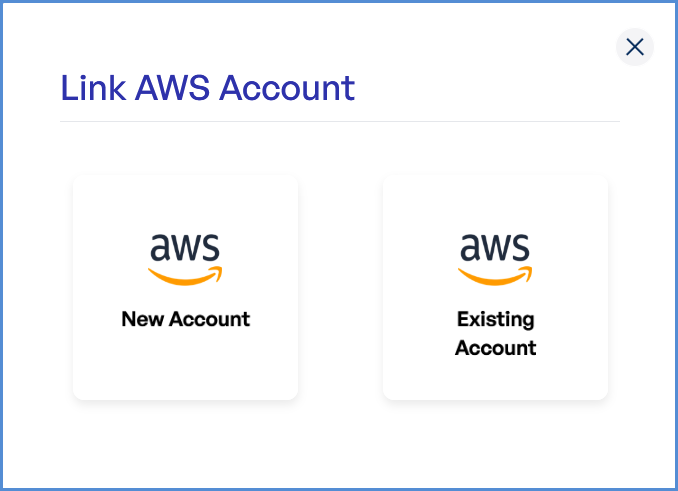
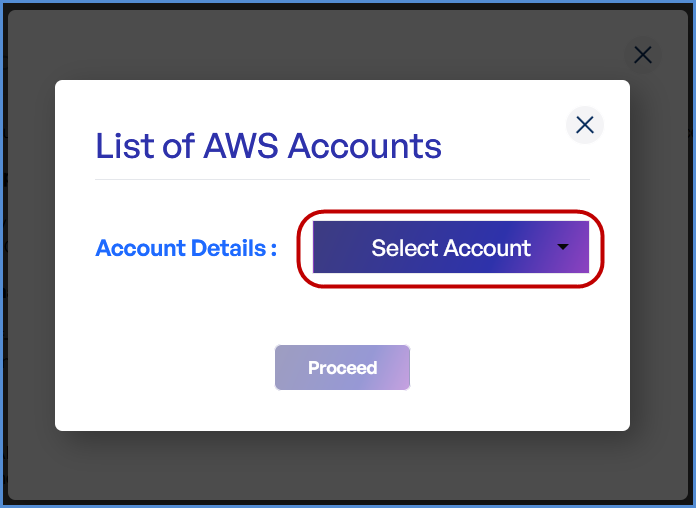
- If an AWS account is already integrated:
- Click on Existing Account.
- Select Select Existing Account.
- Choose the desired AWS account from the list.
- Click Proceed.
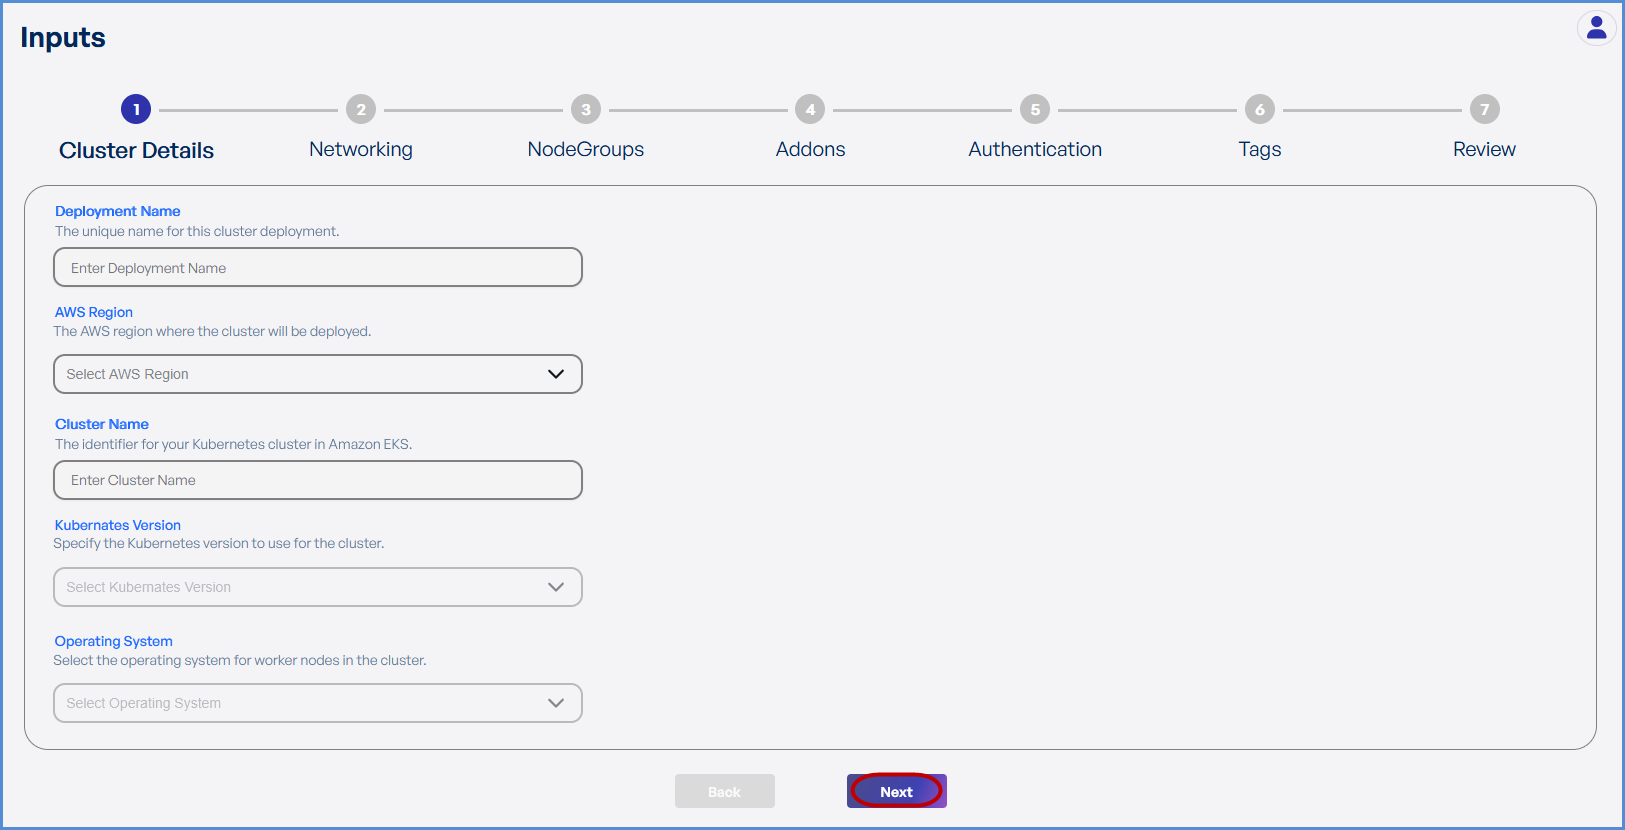
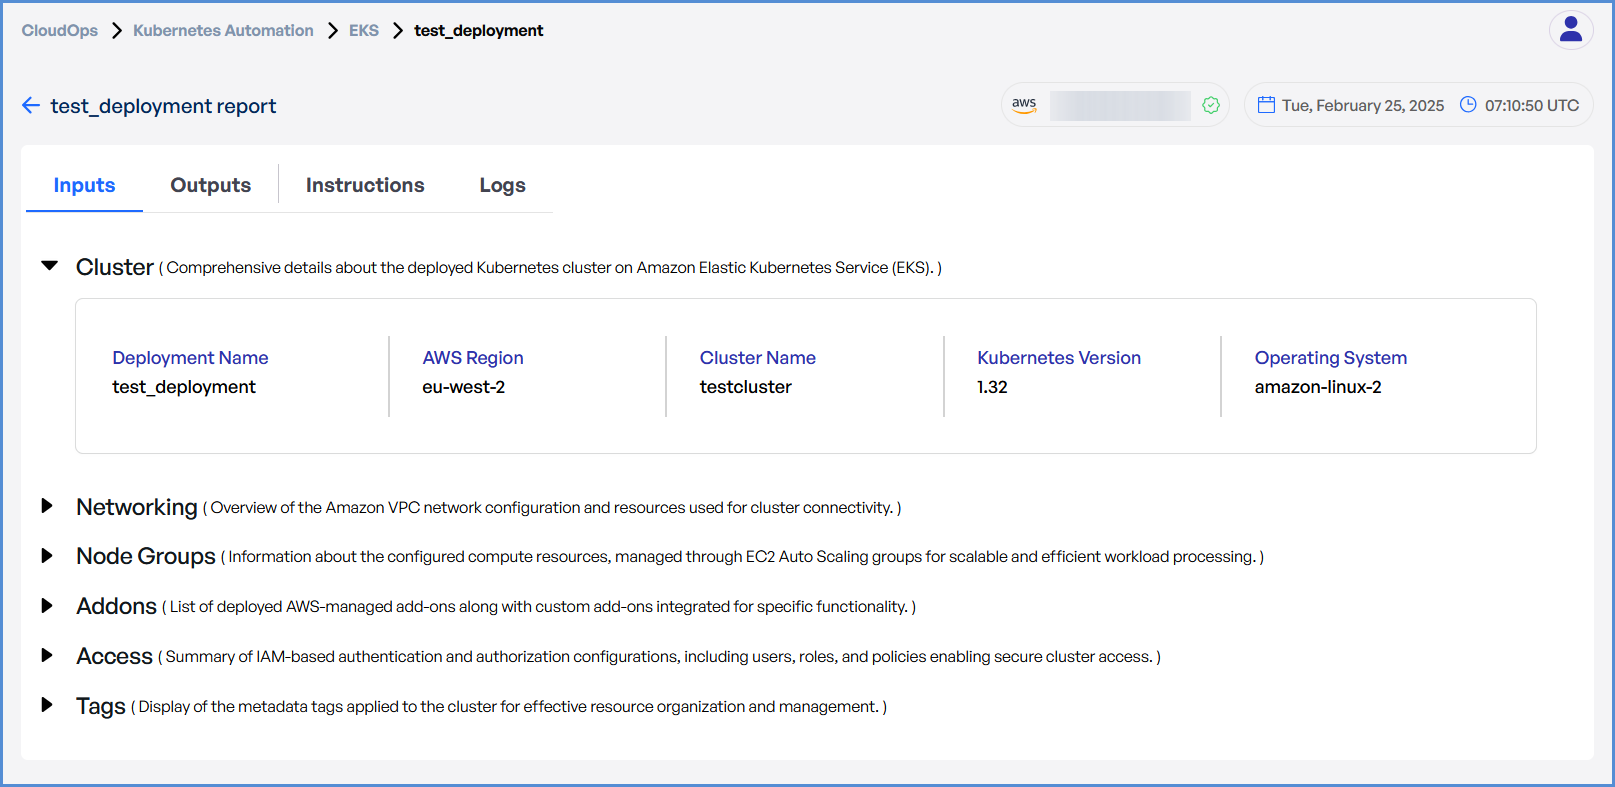
Step 1: Cluster Details
- Enter a unique Deployment Name.
- Select the preferred AWS Region from the dropdown for deploying the Elastic Kubernetes Service (EKS).
- Enter the
preferredpreferred Cluster Name. - Choose the
requiredrequired Kubernetes Version from the drop down. SelectSelect Amazon Linux 2 as the Operating System.ClickClick Next to proceed.
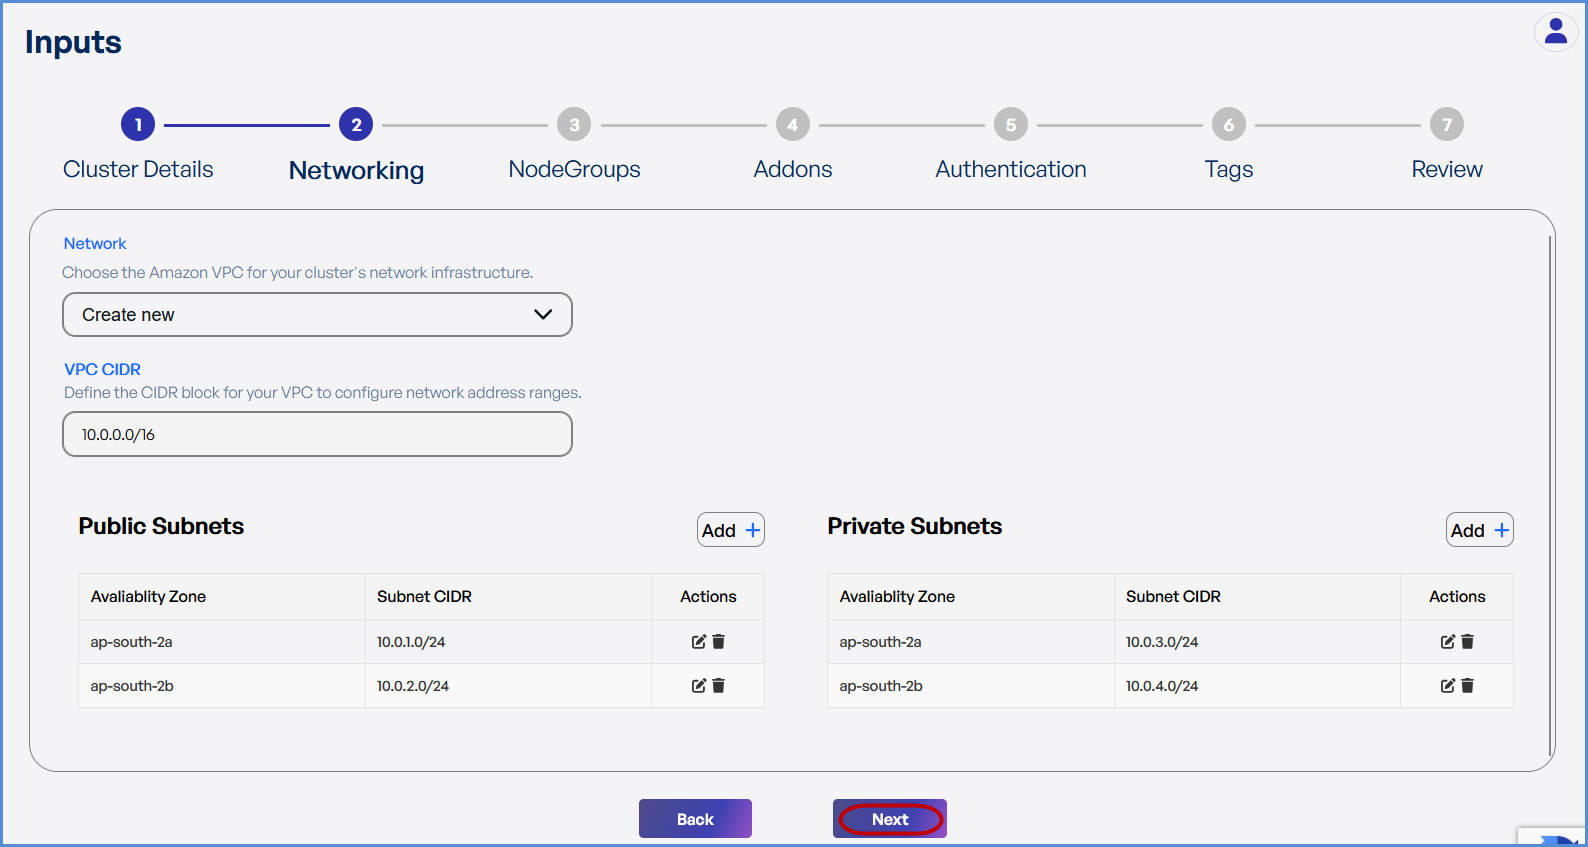
Step 2: Networking
Choose based on your requirement:
- If an existing VPC is available in the selected region:
- Select Use Existing.
- Choose the VPC ID from the drop down.
- Select
thethe two Private Subnets with different Availability Zones from the list of all subsets in the drop down.
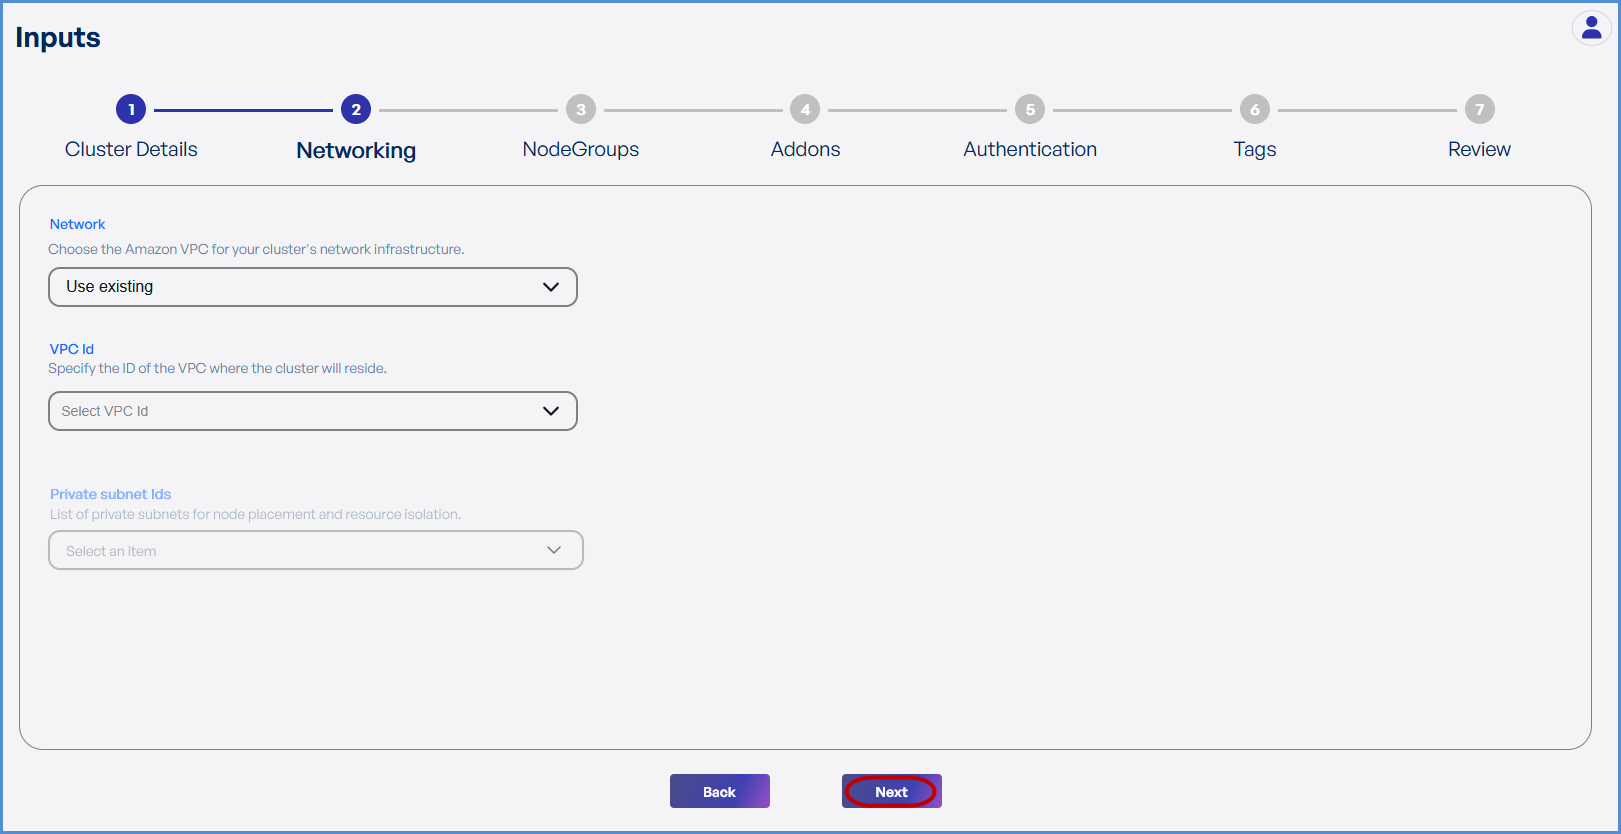
- If a new VPC is required:
- Select Create New.
- Enter the VPC CIDR.
- Add Public and Private Subnets with different Availability Zones as needed.
-
Click Next to continue.
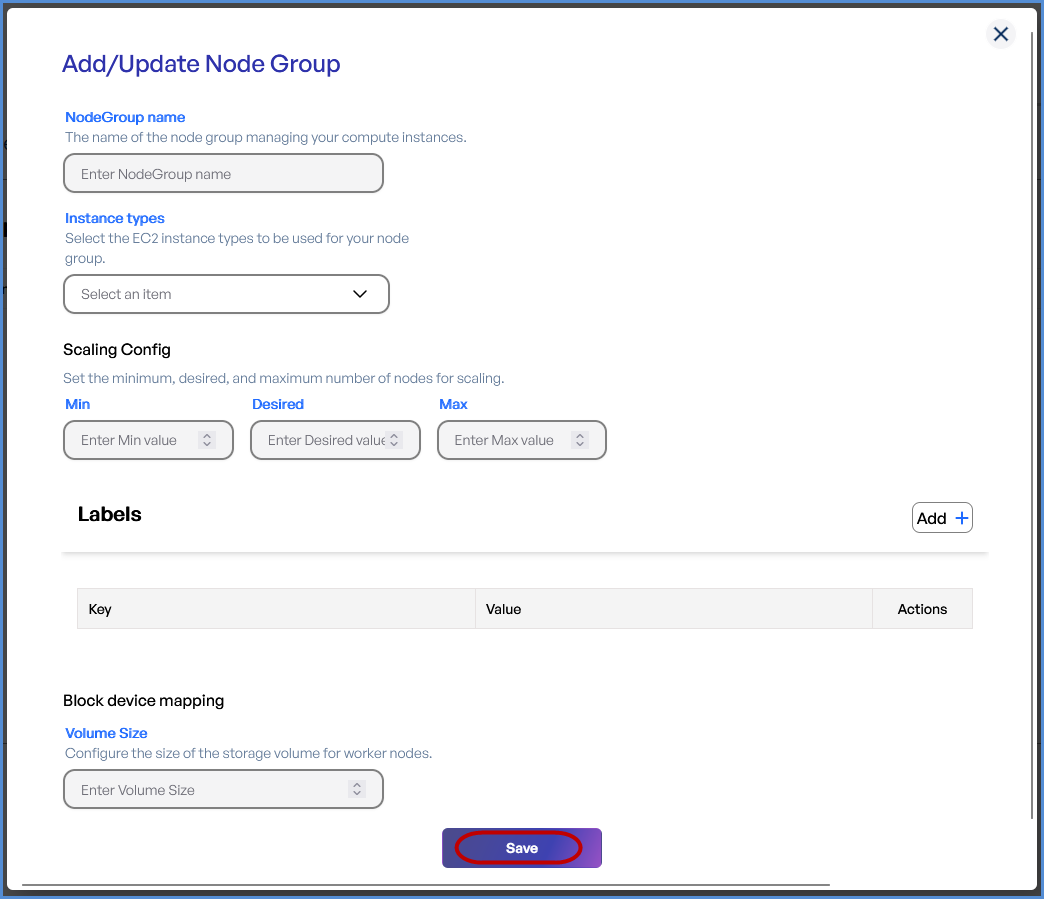
Step 3: Node Groups
- Click + to Add a Node Group.
-
Provide a Node Group Name.
-
Select the desired Instance Types from the drop down.
-
Configure Scaling Settings:
-
Set Minimum, Desired, and Maximum number of nodes.
-
-
Add Labels by entering Key-Value pairs.
-
Define the Volume Size which should be a Minimum of 30GB.
- Click Save and then Next.
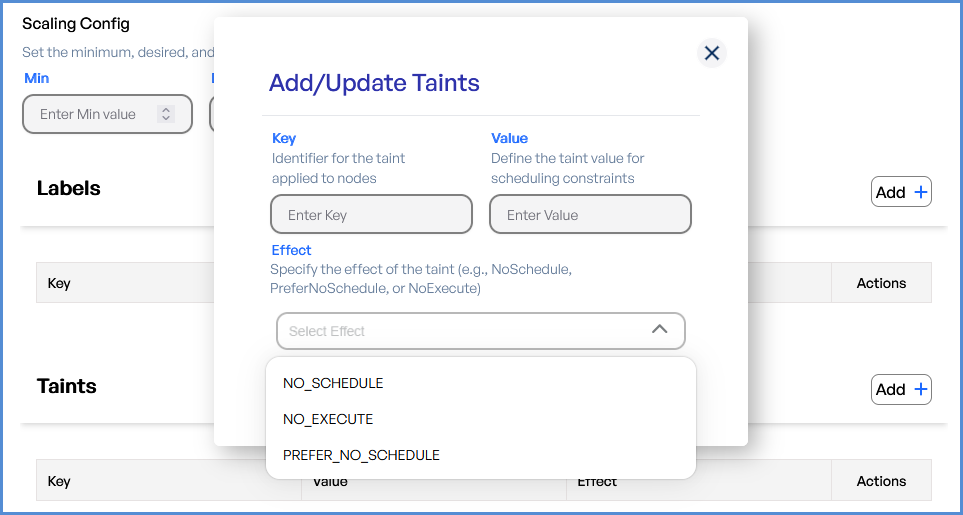
Tip: Taints can be applied from the second node group:
- Enter the Key and Value for the Taints.
- Choose
thethe Effect for scheduling of pods.
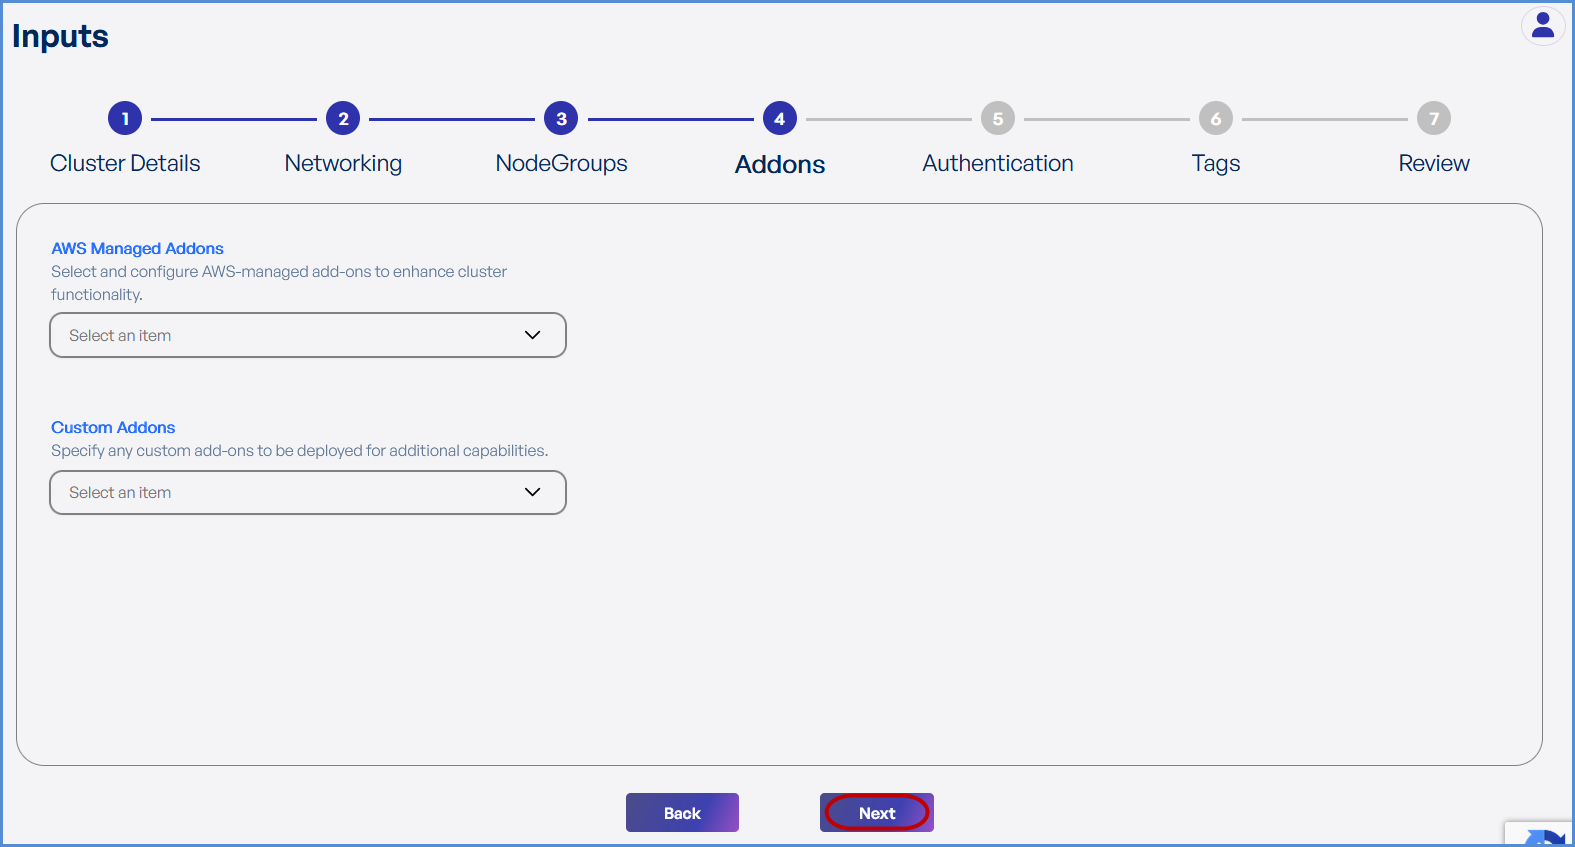
Step 4: Add-ons
-
Choose the required AWS Managed Add-ons from the drop down .
-
Choose the desired Custom Add-ons from the drop down.
- Click Next.
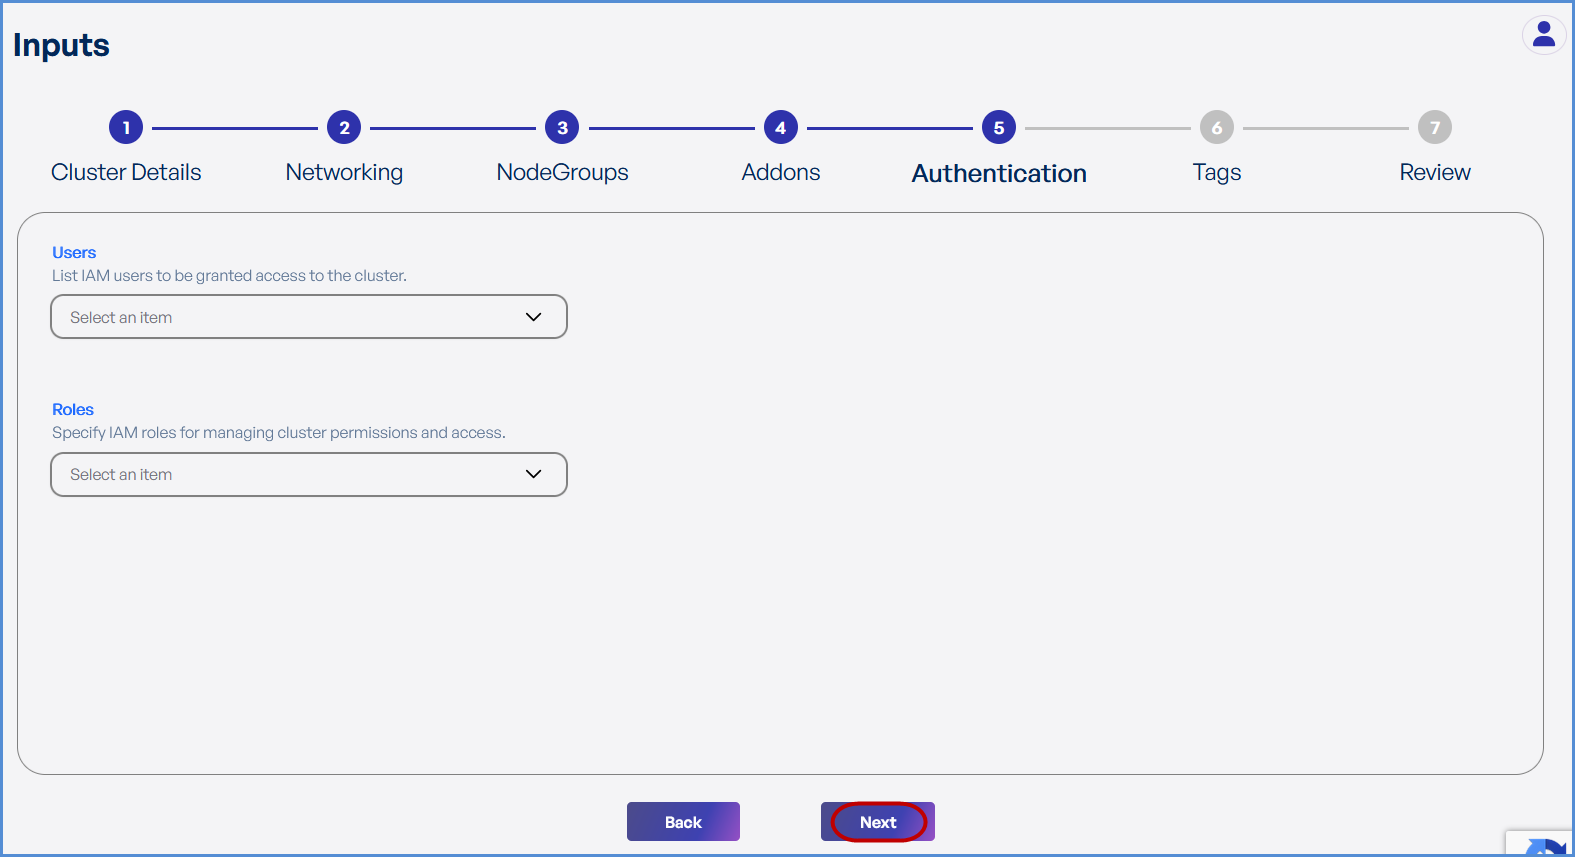
Step 5: Authentication
-
Choose the existing IAM Users and Roles from the drop down to grant ADMIN access to EKS environment.
The Role with suffix -XopsRole-### is created at the time of account integration and will get an admin role by default.
- Click Next.
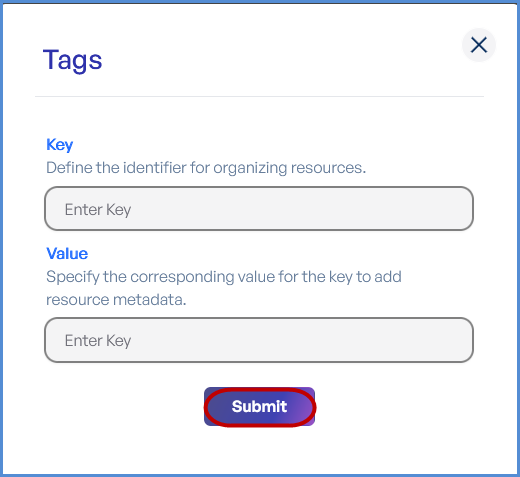
Step 6: Tags
-
Click Add to enter Key-Value pairs for tagging resources.
-
Click Submit and then Next.
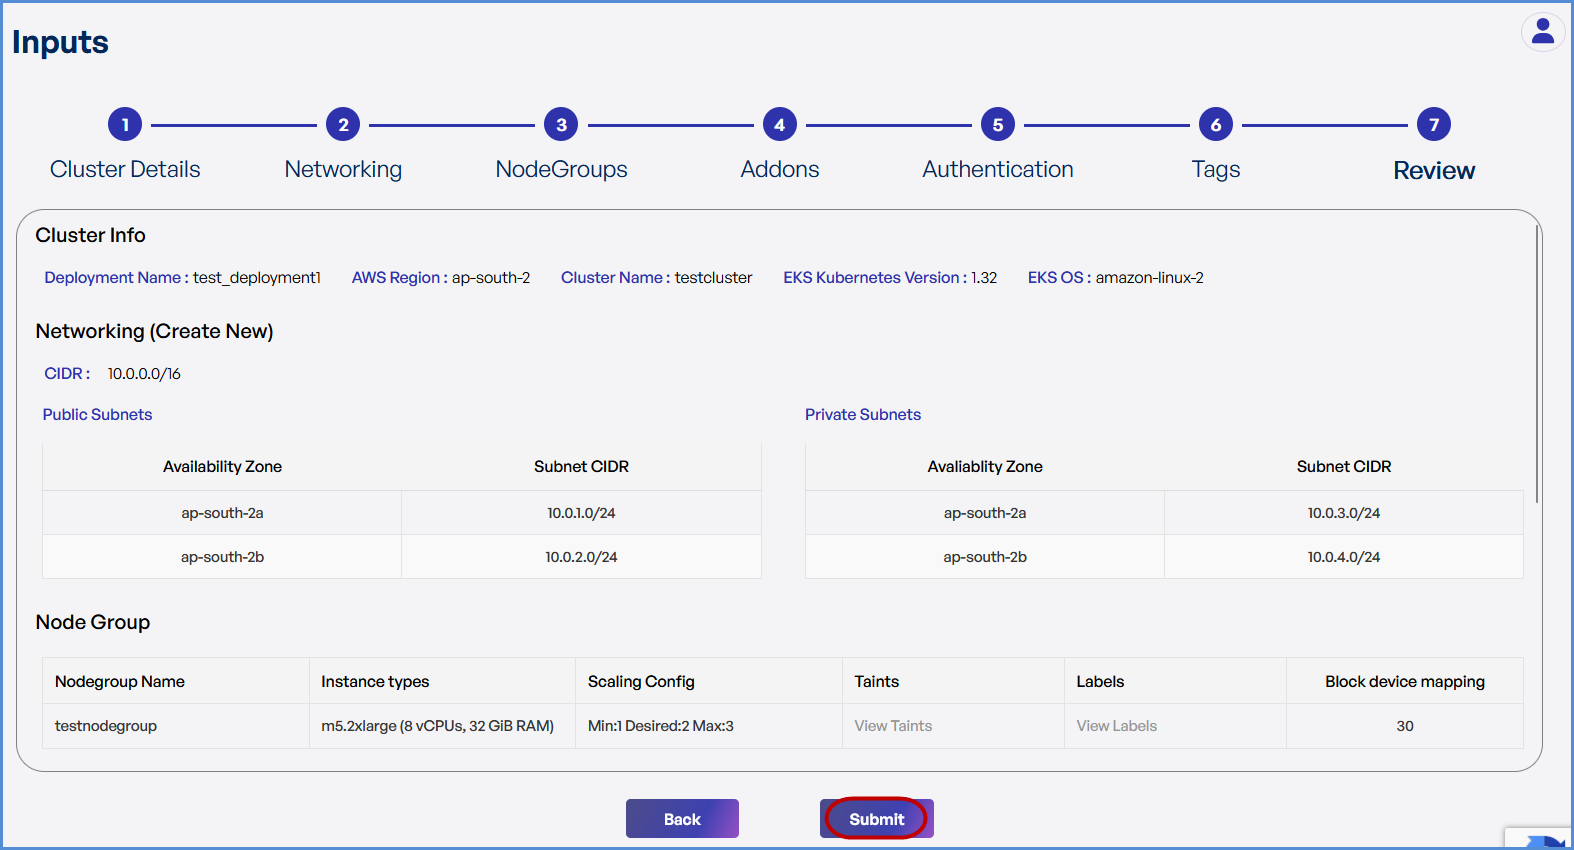
Step 7: Review and Deployment
-
Review all configuration details.
-
Click Submit.
Note: To make modifications, navigate back through each step sequentially and apply the necessary changes before proceeding.
-
The system redirects to the Deployments Page, displaying a loader.
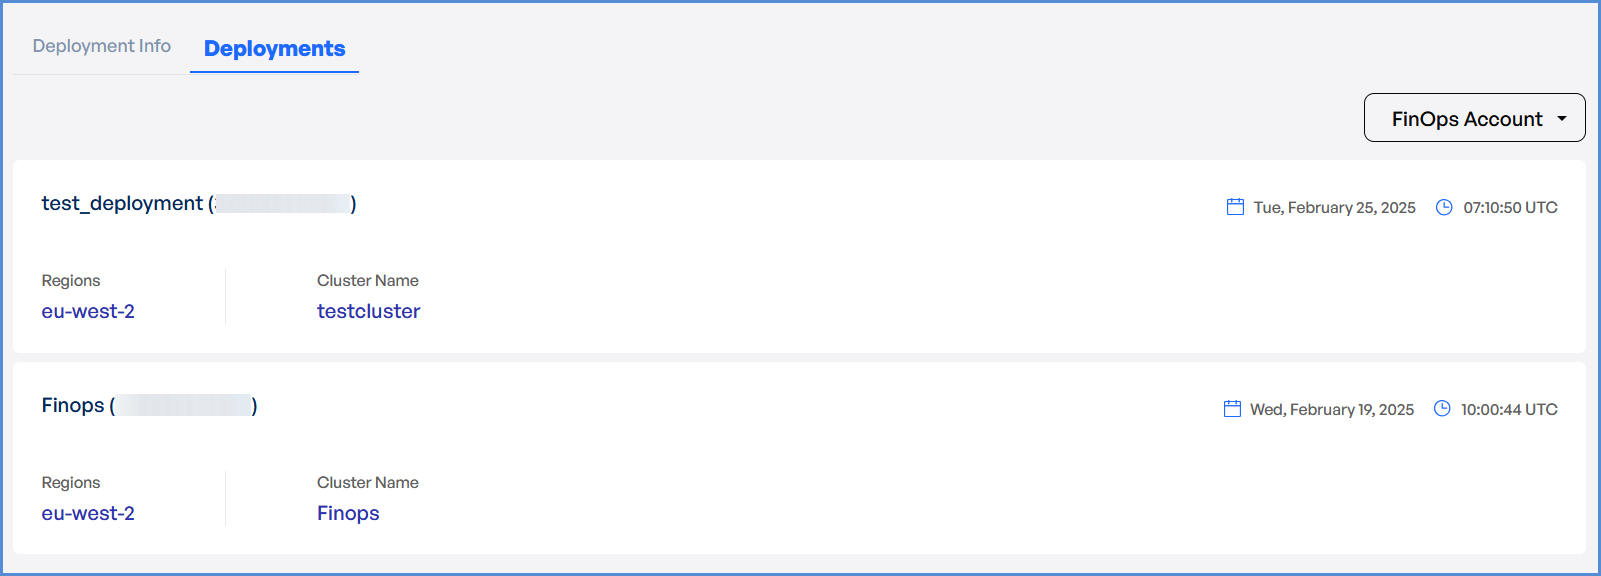
- Once deployment is completed:
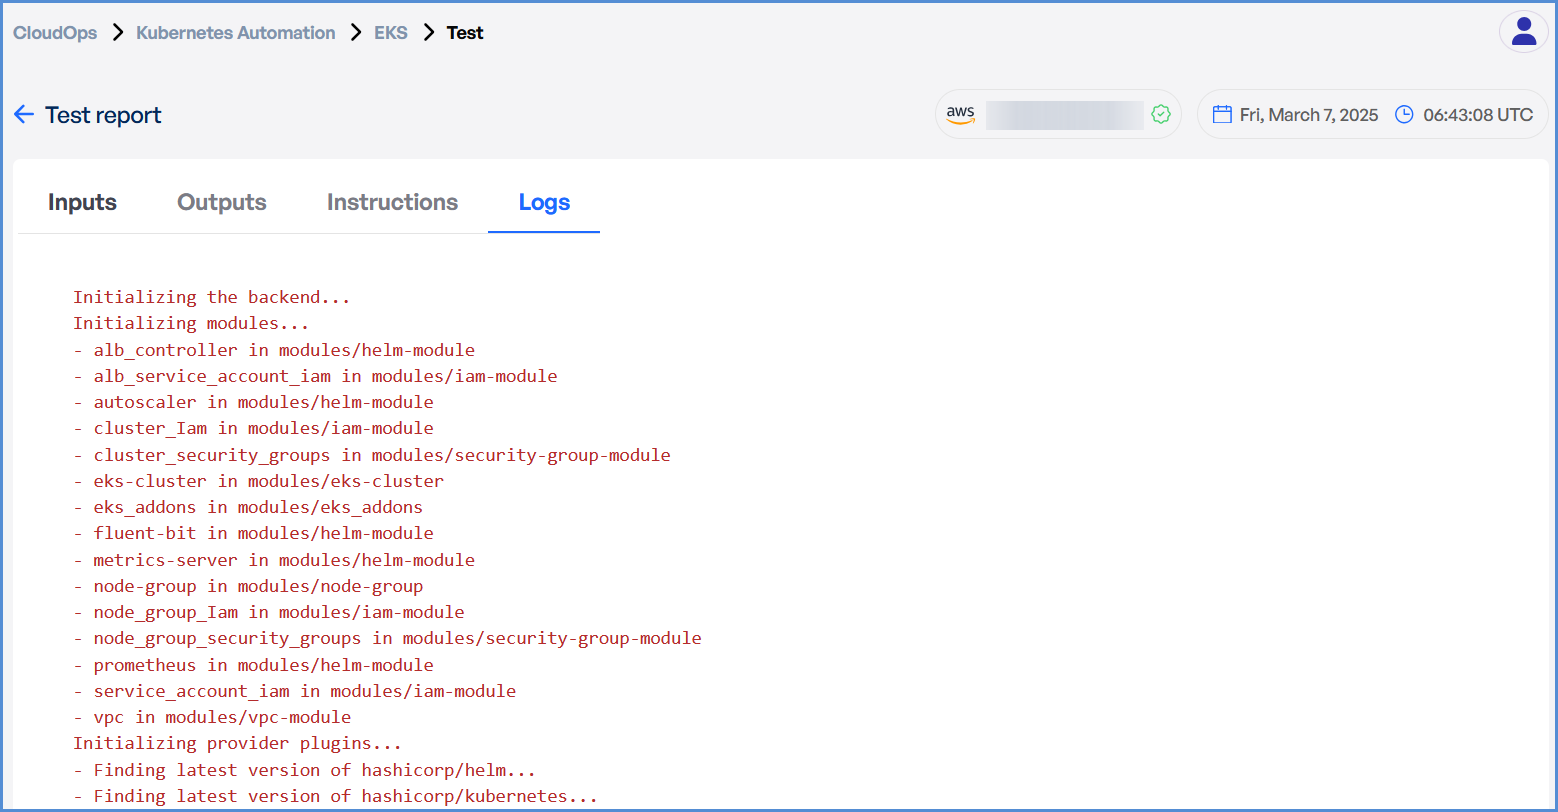
- Click on
thethe Deployment to view Inputs, Outputs, Instructions, and Logs.
- Click on
- In case of an EKS deployment failure, click on the failure message to access the detailed logs.

Note: The error message will vary depending on the stage at which the deployment failure occurs.
- Analyze the logs to identify the root
causecause and take appropriate corrective actions.