AWS Account Integration
Link AWS Account
Navigating to the Account Integration Page
-
Log in to the Platform
- Access the platform and sign in using your credentials.
-
Open the Account Selector
- Locate the Select account dropdown at the top-right corner of the dashboard.
- Click on it to open the list of available cloud accounts.
-
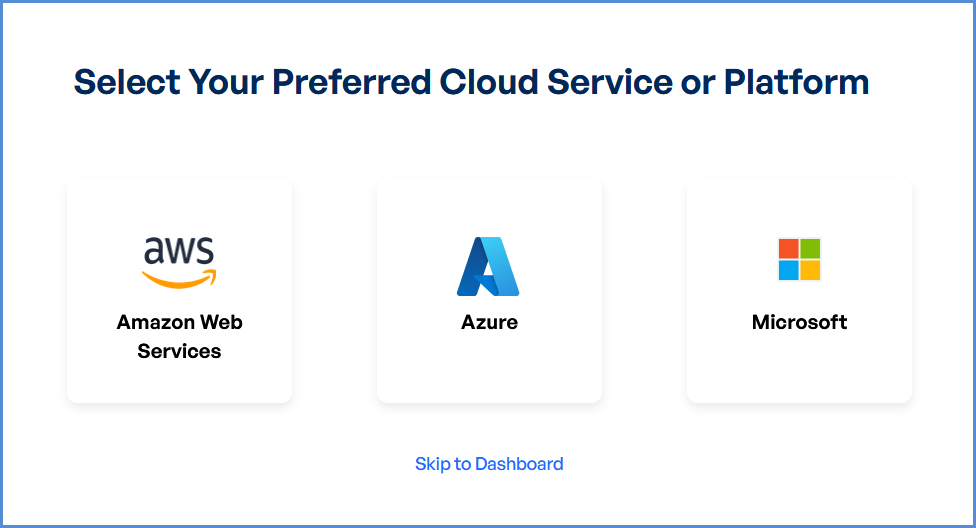
Add Cloud Account
- From the dropdown menu, click on Add Cloud Account. This will redirect you to the Select Your Preferred Cloud Service or Platform page.
- Click on the AWS (Amazon Web Services) card.
Note: Initially, only AWS Management Account can be linked in this section.
No Management Account Initially
If you do not have any management account linked initially to the Xops 360 Portal, follow the steps below to add a new AWS account. After clicking on the AWS (Amazon Web Services) card on the Select Your Preferred Cloud Service or Platform page, a new window will appear prompting you to select the AWS Account Type.
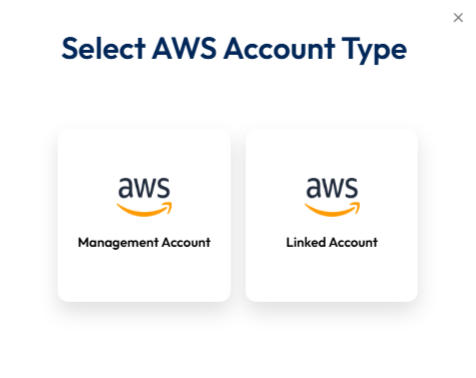
Select AWS Account Type
On the Select AWS Account Type screen, you will see two options:
-
Management Account
-
Linked Account
Click on Management Account to proceed with linking your AWS Management Account to the Xops 360 platform.
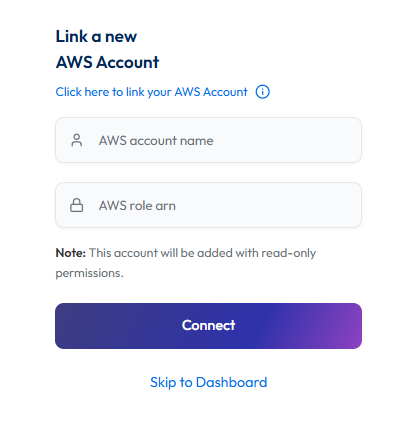
Link a New AWS Account
After selecting Management Account, you will be redirected to the Link a New AWS Account page.
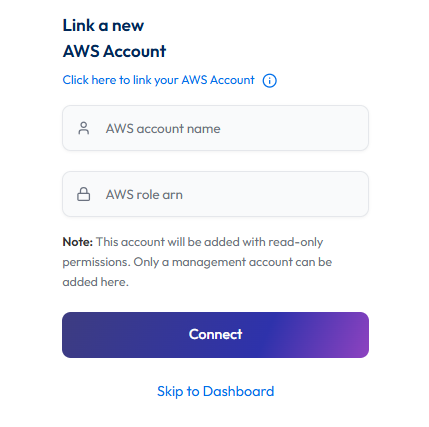
On this page, enter the following details :
-
AWS Account Name – Provide a name to identify the AWS account in the platform.
-
AWS Role ARN – Enter the IAM Role ARN that allows XOps 360 to access the AWS account.
Once completed, click Connect to link the AWS account.
Adding a Linked AWS Account
If you already have a management account linked to the Xops 360 Portal and want to add a linked (child) AWS account, follow these steps:
-
Log in to the Platform
- Sign in and open the platform dashboard.
-
Open the Account Selector
- Locate the Select account dropdown at the top-right corner of the dashboard.
- Click on it to open the list of available cloud accounts.
- Add Cloud Account
- From the dropdown menu, click on Add Cloud Account. This will redirect you to the Select Your Preferred Cloud Service or Platform page.
- Click on the AWS (Amazon Web Services) card .
- After clicking on the AWS (Amazon Web Services) card on the Select Your Preferred Cloud Service or Platform page, a new window will appear prompting you to select the AWS Account Type.
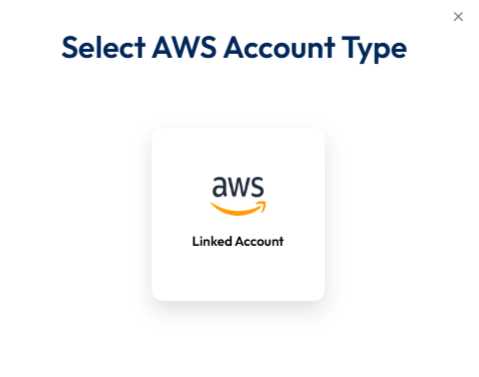
Select AWS Account Type
On the Select AWS Account Type screen, the Linked Account option will be displayed.
Click on Linked Account to proceed with linking your AWS Linked Account to the Xops 360 platform.
Link a New AWS Account
After selecting Linked Account, you will be redirected to the Link a New AWS Account page.
On this page, enter the following details :
-
AWS Account Name – Provide a name to identify the AWS account in the platform.
-
AWS Role ARN – Enter the IAM Role ARN that allows XOps 360 to access the AWS account.
Once completed, click Connect to link the AWS account.
Initiating Account Integration
-
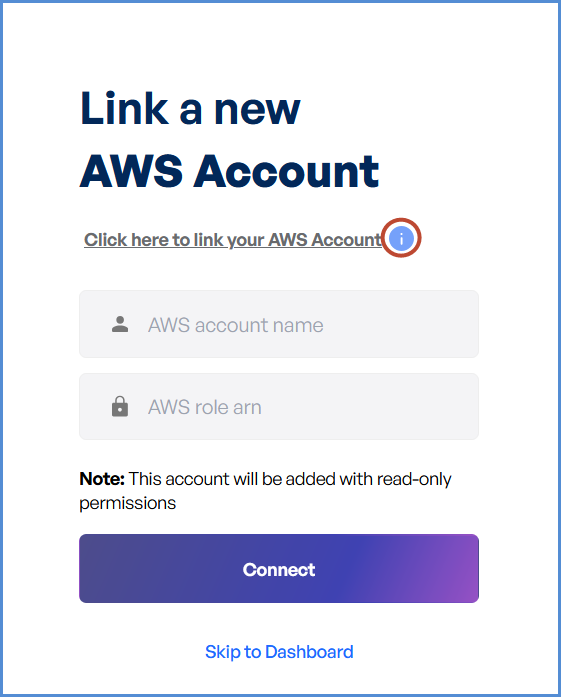
Access Setup Instructions
- Click the Information ("i") button to view step-by-step setup guidance.
-
Retrieve AWS Role ARN
- Follow the setup guide to create a required Cloud Formation stack in the AWS Management Console.
- Once the stack is created, navigate to the Outputs tab in the stack details page.
- Copy the AWS Role ARN from the output.
-
Configure AWS Integration
- Return to the platform’s AWS Integration page.
- Provide a suitable name in the AWS Account Name field.
- Paste the copied AWS Role ARN into the designated field.
- Click Connect to finalize the integration.
Note:
- For any challenges, please contact our support team at support@axiomio.com
- First-Time Login Experience
- When you log in for the first time, you will be prompted to select your preferred cloud service or platform (AWS, EKS Azure, or Microsoft). This selection is required to establish the initial account connection.
- Once your account is successfully connected to AWS, Azure, or Microsoft, this selection screen will not appear in subsequent logins. Instead, you will be directed automatically to the Home page.
- To manage or modify integrations, navigate to the "Integrations" section from the left panel in the dashboard.
AWS Account Management
Access AWS Integration Settings
-
Log in to the Platform
- Sign in and open the platform dashboard.
-
Navigate to AWS Integration
- Open the Side Navigation Panel and select the Integrations tab.
- Click on the AWS card to access its integration settings.
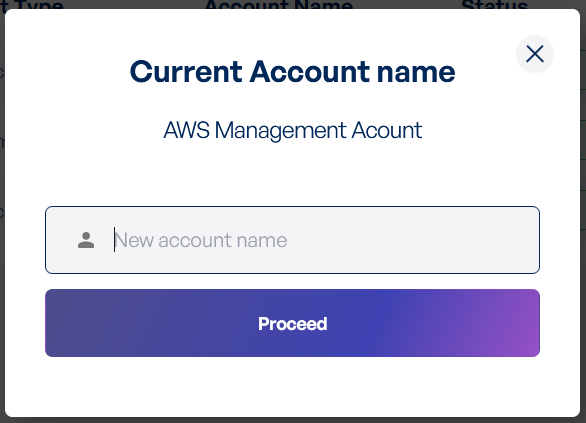
Updating the Account Name
-
Edit the AWS Account Name
- Locate the Edit option next to the existing AWS account name.
- Click the Edit button to enable modifications.

-
Save the New Name
- Enter the new AWS account name in the provided field.
- Click Proceed to confirm the changes.
- A success message will appear, indicating the account name update.
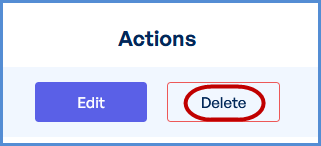
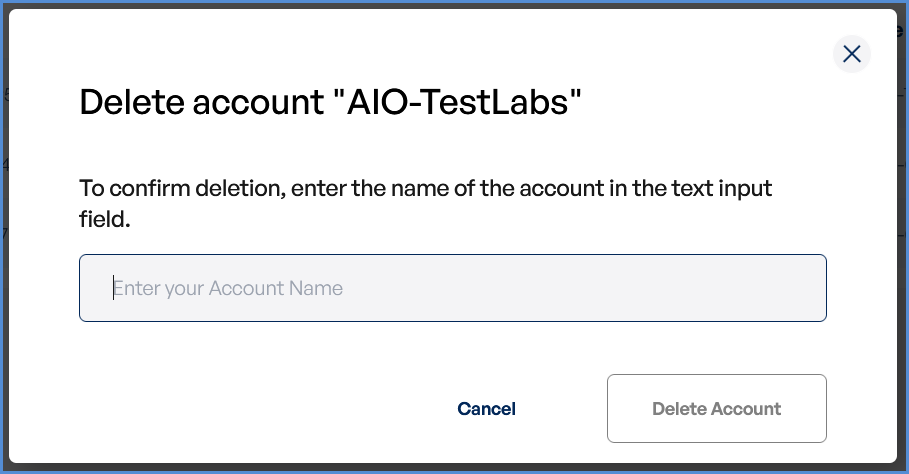
Deleting Linked Account
-
Delete the AWS Account
- Locate the Delete option next to the existing AWS account name.
- Click the Delete.
-
Enter the Account Name
- Enter the AWS account name in the provided field.
- Click Delete Account to confirm the changes.
- A success message will appear, indicating Account has been deleted.
Request Submission Guidelines:
- Subject: Clearly state that the request is for AWS Management account deletion.
- Description: Provide a detailed explanation of your request, including relevant account details and the reason for deletion.
- Once submitted, our support team will review your request and assist you accordingly.